> ## Documentation Index
> Fetch the complete documentation index at: https://docs.resolve.ai/llms.txt
> Use this file to discover all available pages before exploring further.
# App for GitHub
For an overview of Git integration options (auth types, Cloud vs Satellite), see [Git Integration](/git).
This page covers connecting ResolveAI to your code on GitHub, in all three ways customers commonly run it:
* **github.com via the Resolve-managed app**, fastest path. One-click install, no app credentials to manage. See [Connect via the Resolve-managed app](#connect-via-the-resolve-managed-app).
* **Bring-your-own GitHub App**, for GitHub Enterprise Server (on-prem), GitHub Enterprise Cloud, or github.com when you want to operate the app yourself. See [Bring Your Own GitHub App](#bring-your-own-github-app).
* **Token auth**, fine-grained or classic PAT for any GitHub variant; useful for mixed-provider setups. See [Git Integration](/git) for token-auth setup.
## How it works
ResolveAI integrates with GitHub through a GitHub App. Once installed:
* GitHub automatically issues a **short-lived installation token** per request. You never manage or rotate personal access tokens. ResolveAI handles token lifecycle and refresh behind the scenes.
* The agent **pulls in relevant code, commits, and pull requests** as part of an investigation to help you quickly zero in on the root cause.
* You can **ask questions that span your telemetry and your codebase**, and ResolveAI connects the dots for you.
* When you ask for a fix, Resolve **proposes code changes and opens a pull request for your review**. It never pushes commits or merges on its own, remediation is always a user-invoked, review-first flow. This is why the app needs write access on code and pull requests (see [Step 3](#step-3-set-repository-permissions)).
***
## Connect via the Resolve-managed app
Use this on **github.com** when you can install the Resolve-managed GitHub App. It's the fastest path, no app credentials, no private key, no base URL.
Prerequisite: log in to your ResolveAI account first, then go to the Integrations page.
1. Log in to the ResolveAI App at [app0.resolve.ai](https://app0.resolve.ai/)
2. Open the [GitHub Integration](https://app0.resolve.ai/integrations/github) page
3. Create a new integration, add a **Name** and click **Install Application**
4. In GitHub, pick all or a subset of your repositories in the dropdown and click **Save**
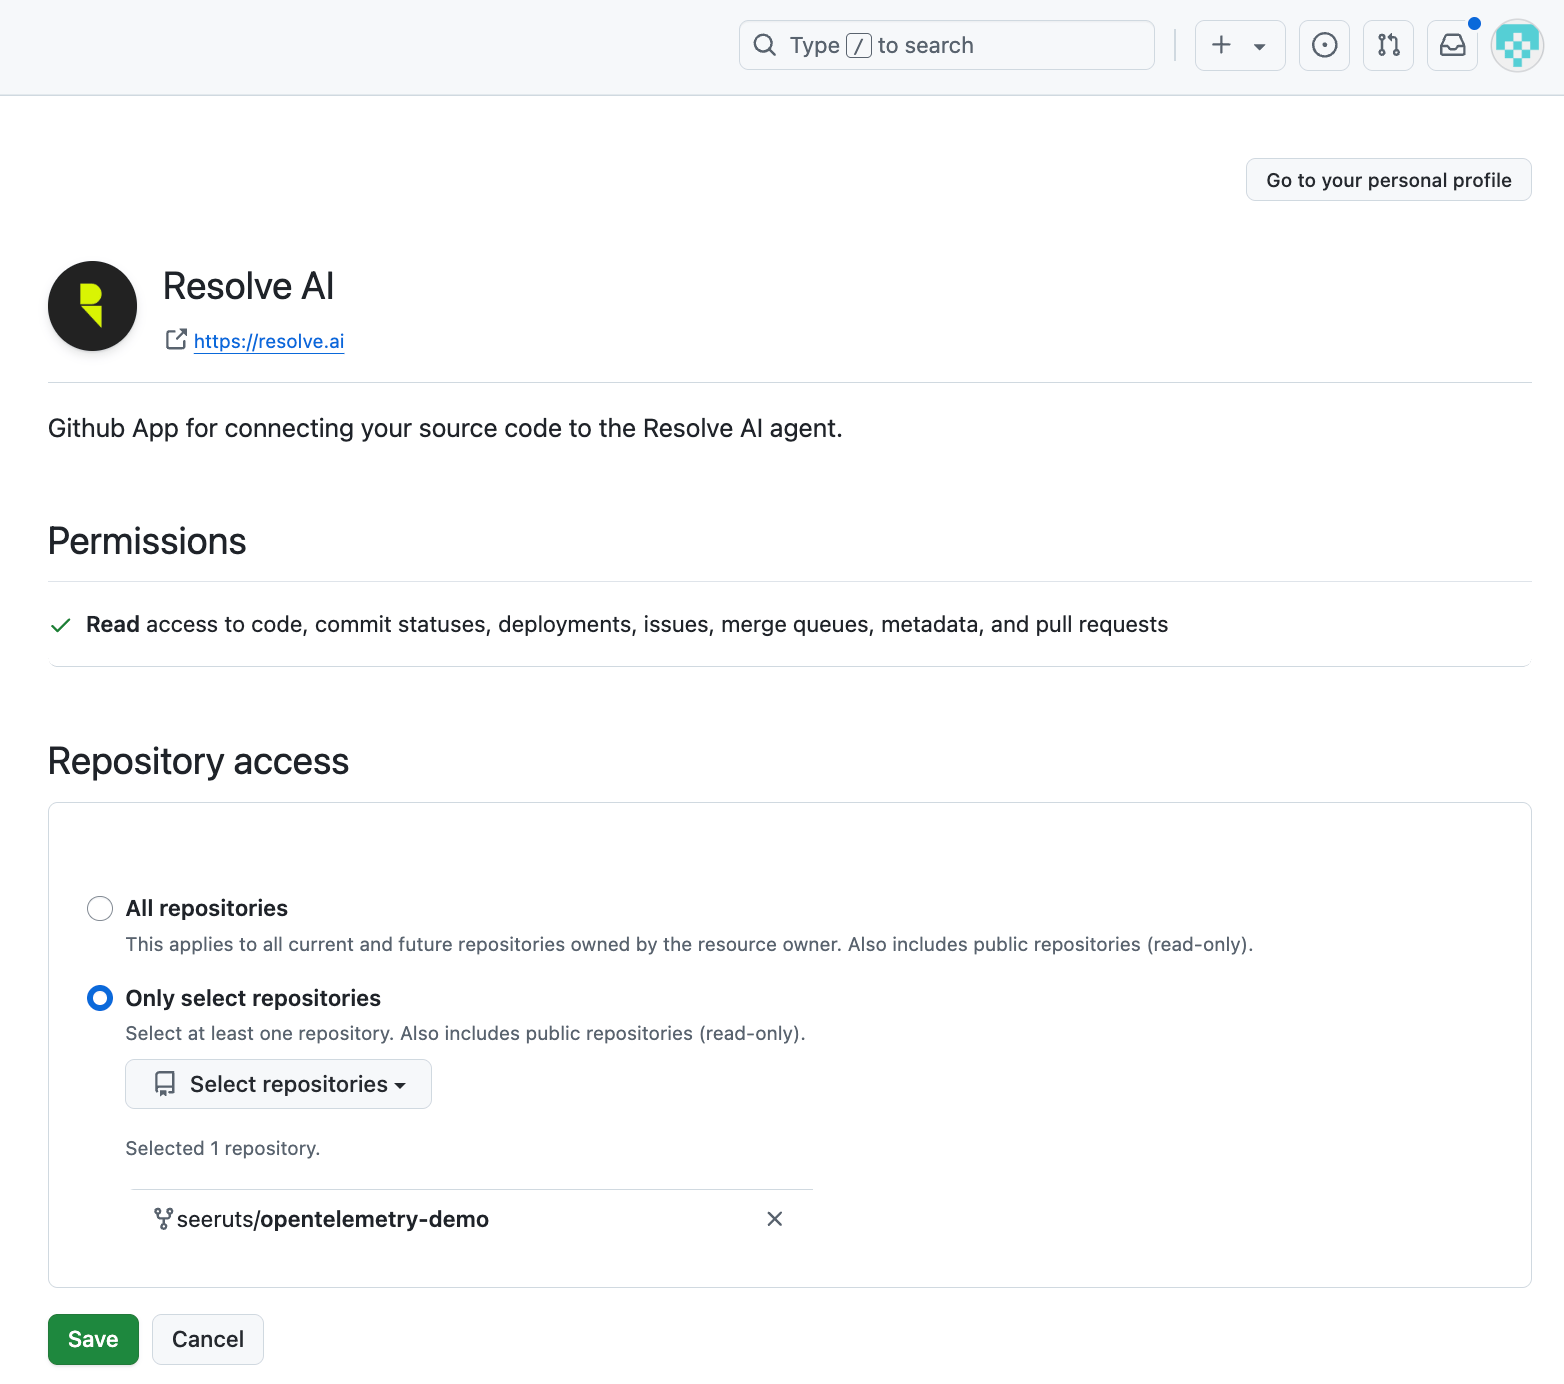
The Resolve-managed app requests the same permission set documented under [Step 3: Set repository permissions](#step-3-set-repository-permissions) below.
***
## Bring Your Own GitHub App
Create a GitHub App **you** own, install it on your organization, and connect it to Resolve via the Git integration's `ghe` auth type.
The same procedure works for **all GitHub variants**:
* **github.com**, when you'd rather operate the app yourself instead of installing the Resolve-managed one (compliance, audit, scoped permissions)
* **GitHub Enterprise Cloud**
* **GitHub Enterprise Server** (on-prem), including air-gapped instances reachable only from inside your network (use a Satellite)
### Step 1: Navigate to Developer Settings for the org account
1. Log in to your GitHub instance (github.com or your GHE Server URL).
2. Navigate to your organization's main page.
3. In the left sidebar, click **Settings**.
4. Click **Developer settings** > **GitHub Apps**.
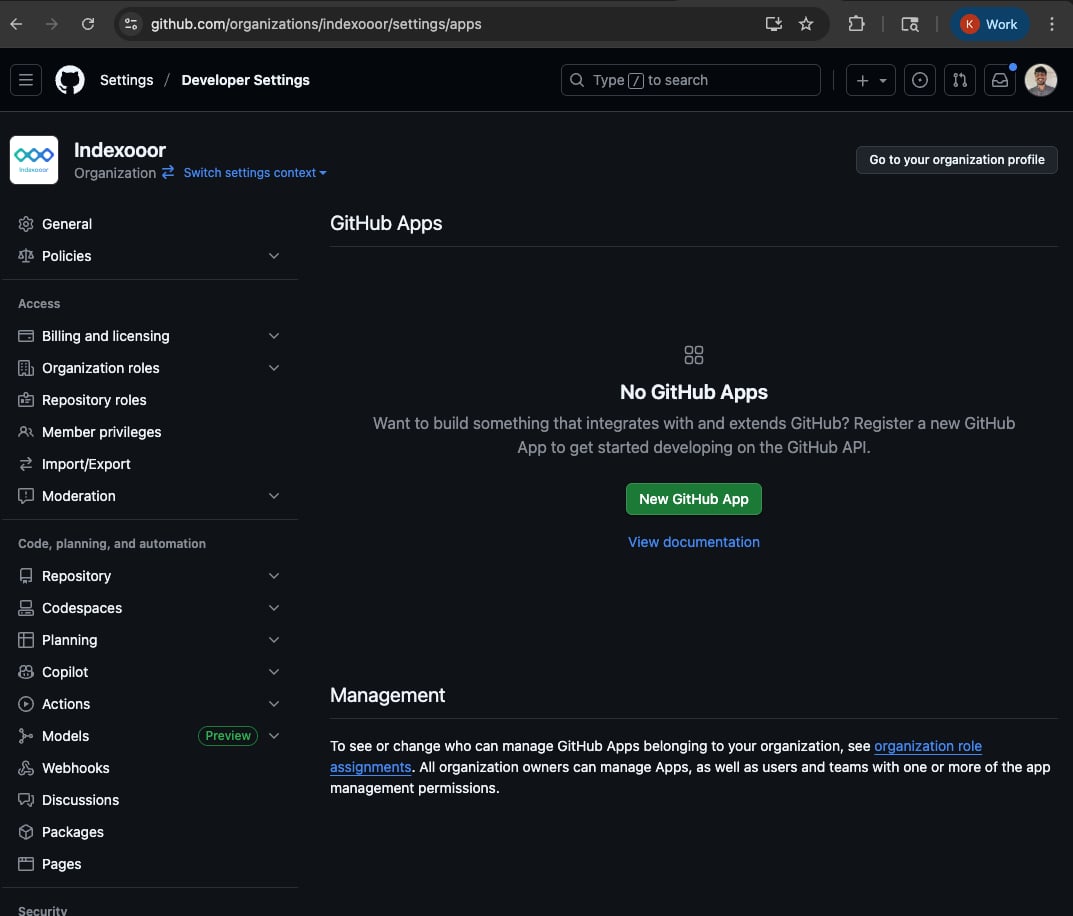 ### Step 2: Click on New GitHub App
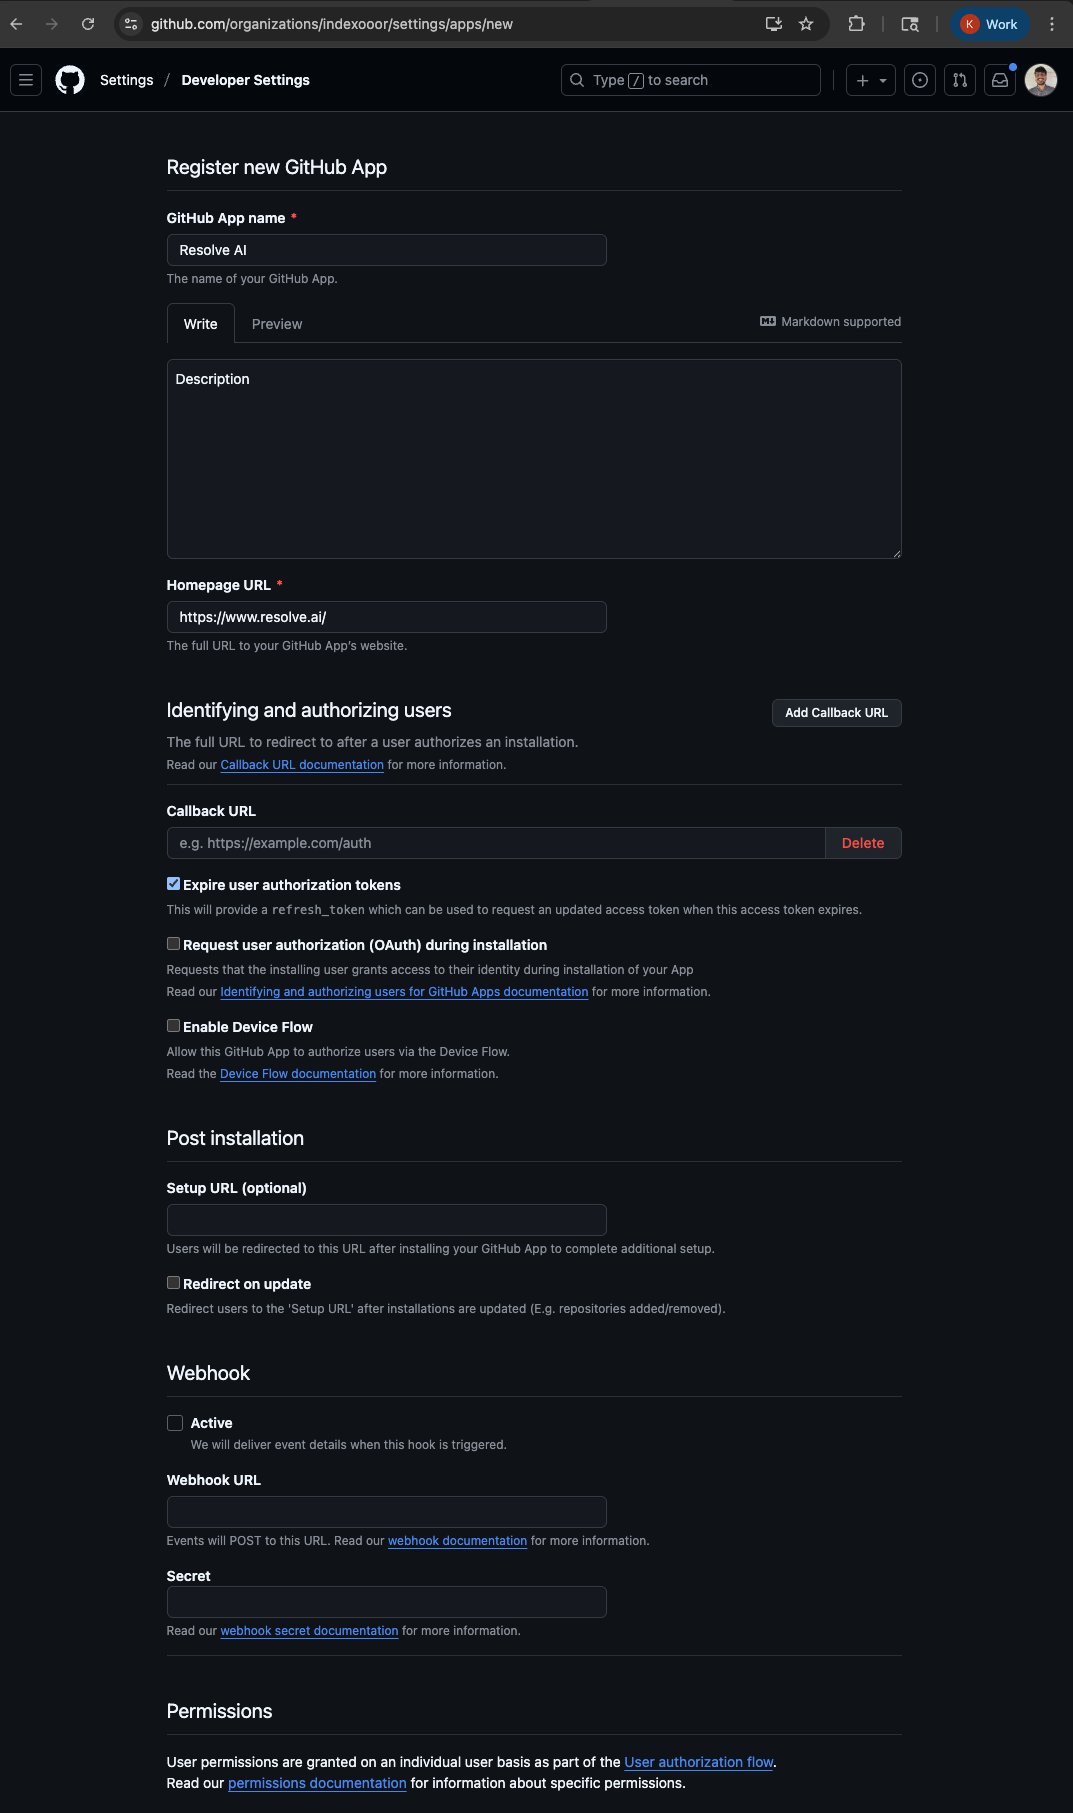
Click **New GitHub App** and fill in the basic details:
* **GitHub App name**: e.g. `ResolveAI` (must be unique on the instance)
* **Homepage URL**: `https://resolve.ai/`
* **Webhook**: uncheck **Active**, Resolve does not consume GitHub webhooks
### Step 2: Click on New GitHub App
Click **New GitHub App** and fill in the basic details:
* **GitHub App name**: e.g. `ResolveAI` (must be unique on the instance)
* **Homepage URL**: `https://resolve.ai/`
* **Webhook**: uncheck **Active**, Resolve does not consume GitHub webhooks
 ### Step 3: Set repository permissions
Grant the GitHub App the following repository permissions:
> **Read** access to: actions, checks, commit statuses, deployments, discussions, issues, merge queues, and metadata
>
> **Read and write** access to: code (Contents) and pull requests
The read scopes let Resolve pull code and investigation context. The read-and-write scopes let it propose code changes and open pull requests for your review.
Granting only **Read** on code and pull requests keeps Resolve in investigate-only mode: it cannot open PRs, and remediation fails at runtime.
Per-permission detail:
| Permission | Access | What it enables |
| ------------------- | ------------ | --------------------------------------------------------------------------------------------------------- |
| **Actions** | Read | Reading GitHub Actions workflow runs and workflow definitions |
| **Checks** | Read | Reading check run results and PR check status |
| **Commit statuses** | Read | Commit-level CI status |
| **Contents (code)** | Read & write | **Read**: cloning, file reads, history, diffs. **Write**: pushing the branch that backs a proposed change |
| **Deployments** | Read | Deployment history, environment context |
| **Discussions** | Read | Repo-level discussions if referenced in investigations |
| **Issues** | Read | Issue context referenced in PRs / investigations |
| **Merge queues** | Read | Merge queue state on PRs |
| **Metadata** | Read | Mandatory base permission required for any GitHub App |
| **Pull requests** | Read & write | **Read**: PR metadata, diffs, comments, file contents. **Write**: opening pull requests for your review |
**Recently added.** **Actions**, **Checks**, and **Discussions** are newly recommended scopes. Grant them so investigations can read GitHub Actions runs, PR check status, and any in-repo discussions referenced as context. If you previously installed Resolve's app with a narrower set, accept the prompt to apply the updated permissions on the existing installation, no reinstall is required.
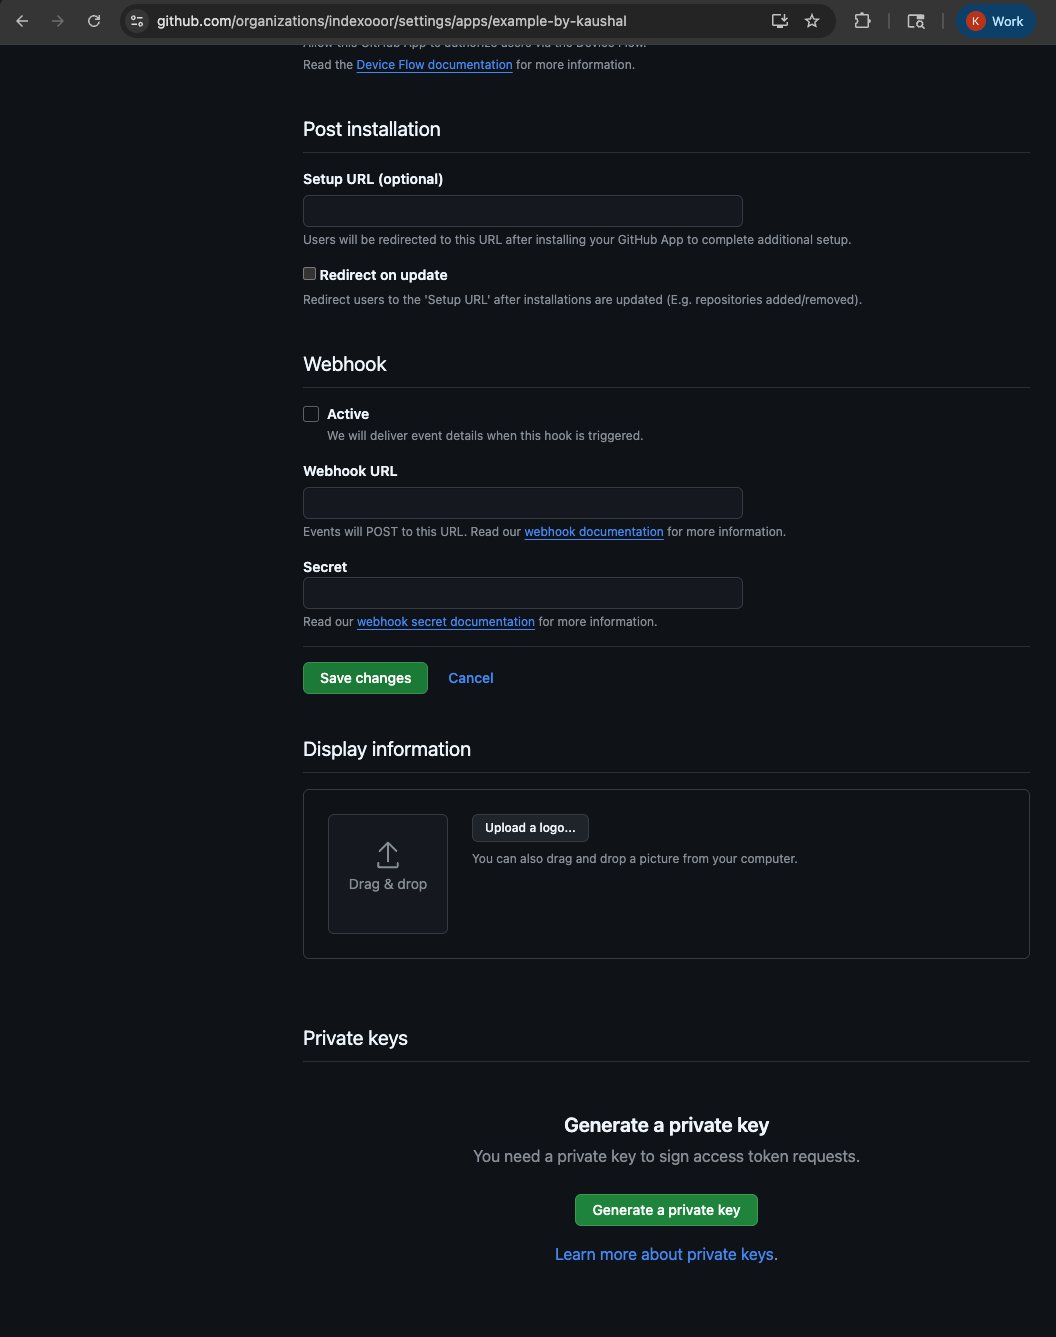
### Step 4: Collect credentials and generate a private key
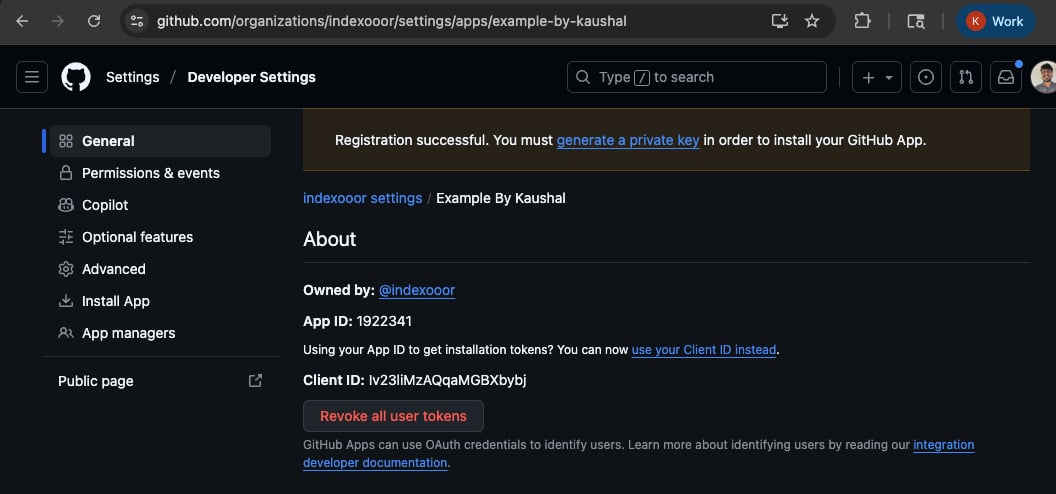
After saving, capture from the app settings page:
1. **App ID**, shown on the **General** tab
2. **Private key**, scroll down to **Private keys** and click **Generate a private key**; a `.pem` file downloads. Store it somewhere safe, GitHub will not show it again.
### Step 3: Set repository permissions
Grant the GitHub App the following repository permissions:
> **Read** access to: actions, checks, commit statuses, deployments, discussions, issues, merge queues, and metadata
>
> **Read and write** access to: code (Contents) and pull requests
The read scopes let Resolve pull code and investigation context. The read-and-write scopes let it propose code changes and open pull requests for your review.
Granting only **Read** on code and pull requests keeps Resolve in investigate-only mode: it cannot open PRs, and remediation fails at runtime.
Per-permission detail:
| Permission | Access | What it enables |
| ------------------- | ------------ | --------------------------------------------------------------------------------------------------------- |
| **Actions** | Read | Reading GitHub Actions workflow runs and workflow definitions |
| **Checks** | Read | Reading check run results and PR check status |
| **Commit statuses** | Read | Commit-level CI status |
| **Contents (code)** | Read & write | **Read**: cloning, file reads, history, diffs. **Write**: pushing the branch that backs a proposed change |
| **Deployments** | Read | Deployment history, environment context |
| **Discussions** | Read | Repo-level discussions if referenced in investigations |
| **Issues** | Read | Issue context referenced in PRs / investigations |
| **Merge queues** | Read | Merge queue state on PRs |
| **Metadata** | Read | Mandatory base permission required for any GitHub App |
| **Pull requests** | Read & write | **Read**: PR metadata, diffs, comments, file contents. **Write**: opening pull requests for your review |
**Recently added.** **Actions**, **Checks**, and **Discussions** are newly recommended scopes. Grant them so investigations can read GitHub Actions runs, PR check status, and any in-repo discussions referenced as context. If you previously installed Resolve's app with a narrower set, accept the prompt to apply the updated permissions on the existing installation, no reinstall is required.
### Step 4: Collect credentials and generate a private key
After saving, capture from the app settings page:
1. **App ID**, shown on the **General** tab
2. **Private key**, scroll down to **Private keys** and click **Generate a private key**; a `.pem` file downloads. Store it somewhere safe, GitHub will not show it again.
 ### Step 5: Install the GitHub App
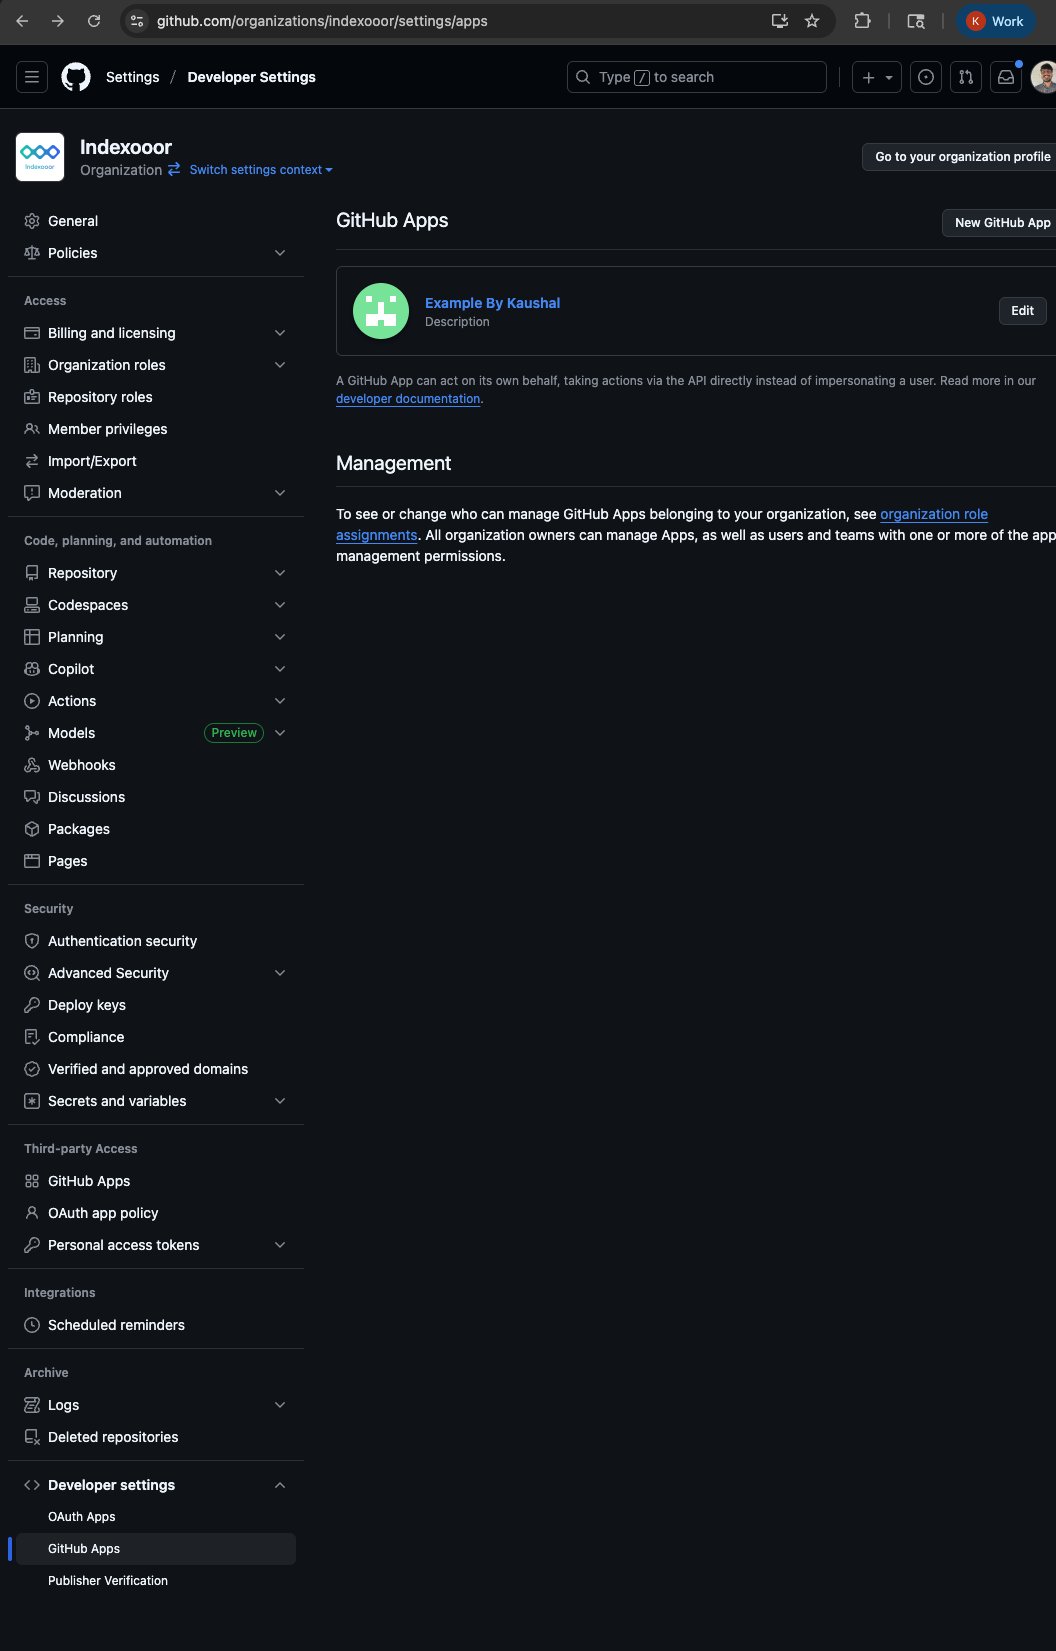
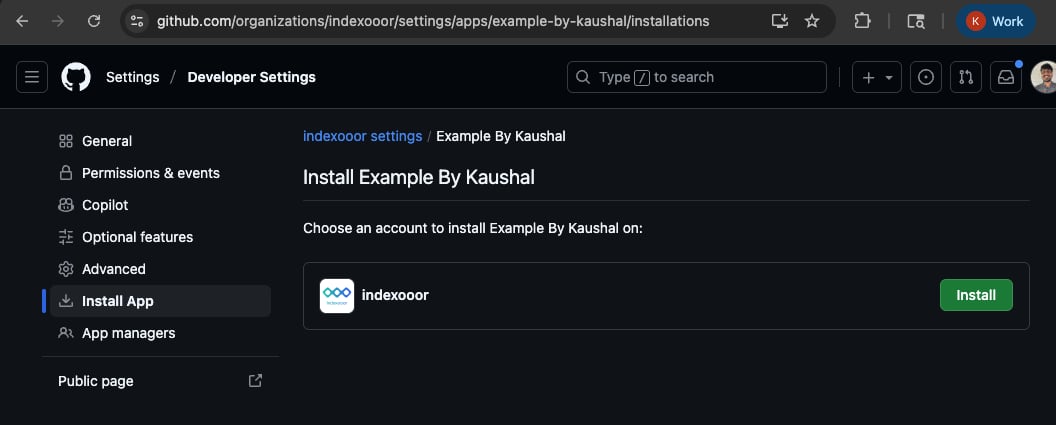
From the app settings page:
1. Click **Edit** on the app you just created (or **Install App** in the left sidebar).
2. Click **Install** next to your organization.
3. Choose **All repositories** or **Only select repositories** and pick the repos you want Resolve to access.
### Step 5: Install the GitHub App
From the app settings page:
1. Click **Edit** on the app you just created (or **Install App** in the left sidebar).
2. Click **Install** next to your organization.
3. Choose **All repositories** or **Only select repositories** and pick the repos you want Resolve to access.
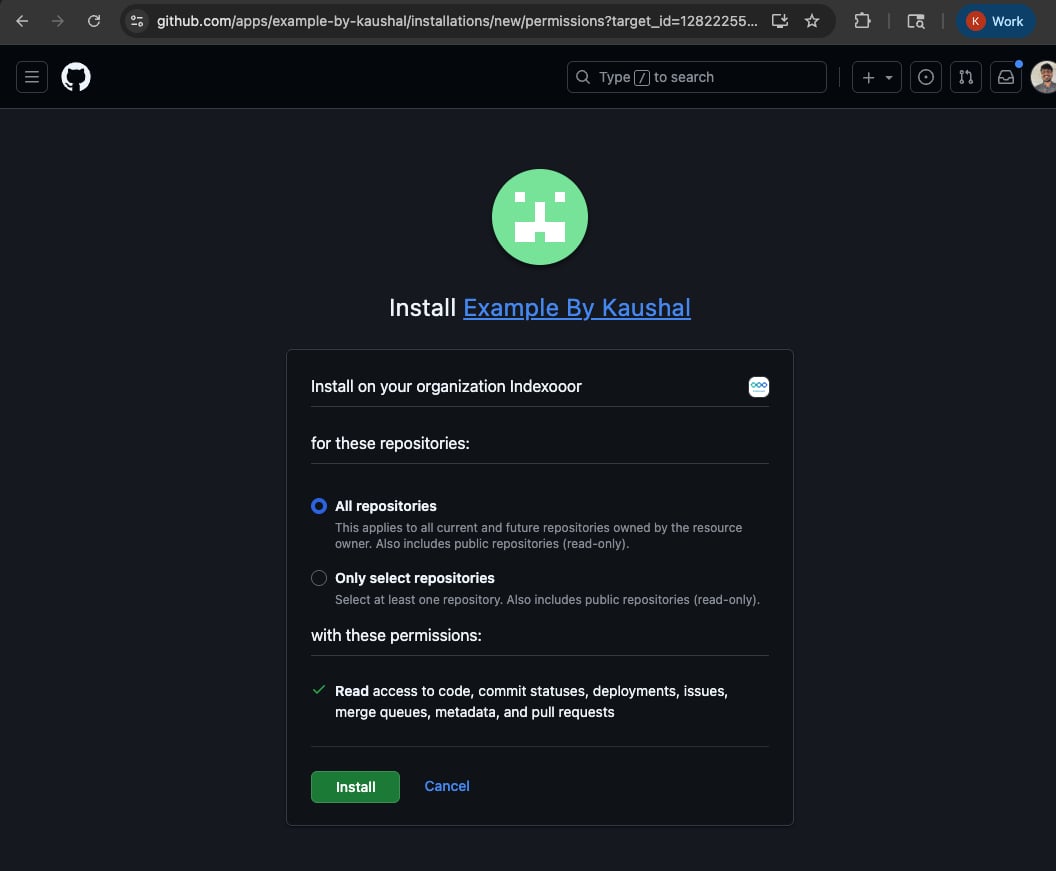 The permission summary GitHub shows on this screen mirrors exactly what you configured in [Step 3](#step-3-set-repository-permissions). Confirm it matches the full recommended set: **Read and write** on **code** and **pull requests** (this is what enables PR creation), plus **Read** on actions, checks, commit statuses, deployments, discussions, issues, merge queues, and metadata. An older install may show a narrower summary, for example read-only on code/pull requests, or missing actions/checks/discussions. If so, return to the app's **Permissions & events** settings, add the missing permissions, and accept the update prompt on the existing installation (no reinstall needed).
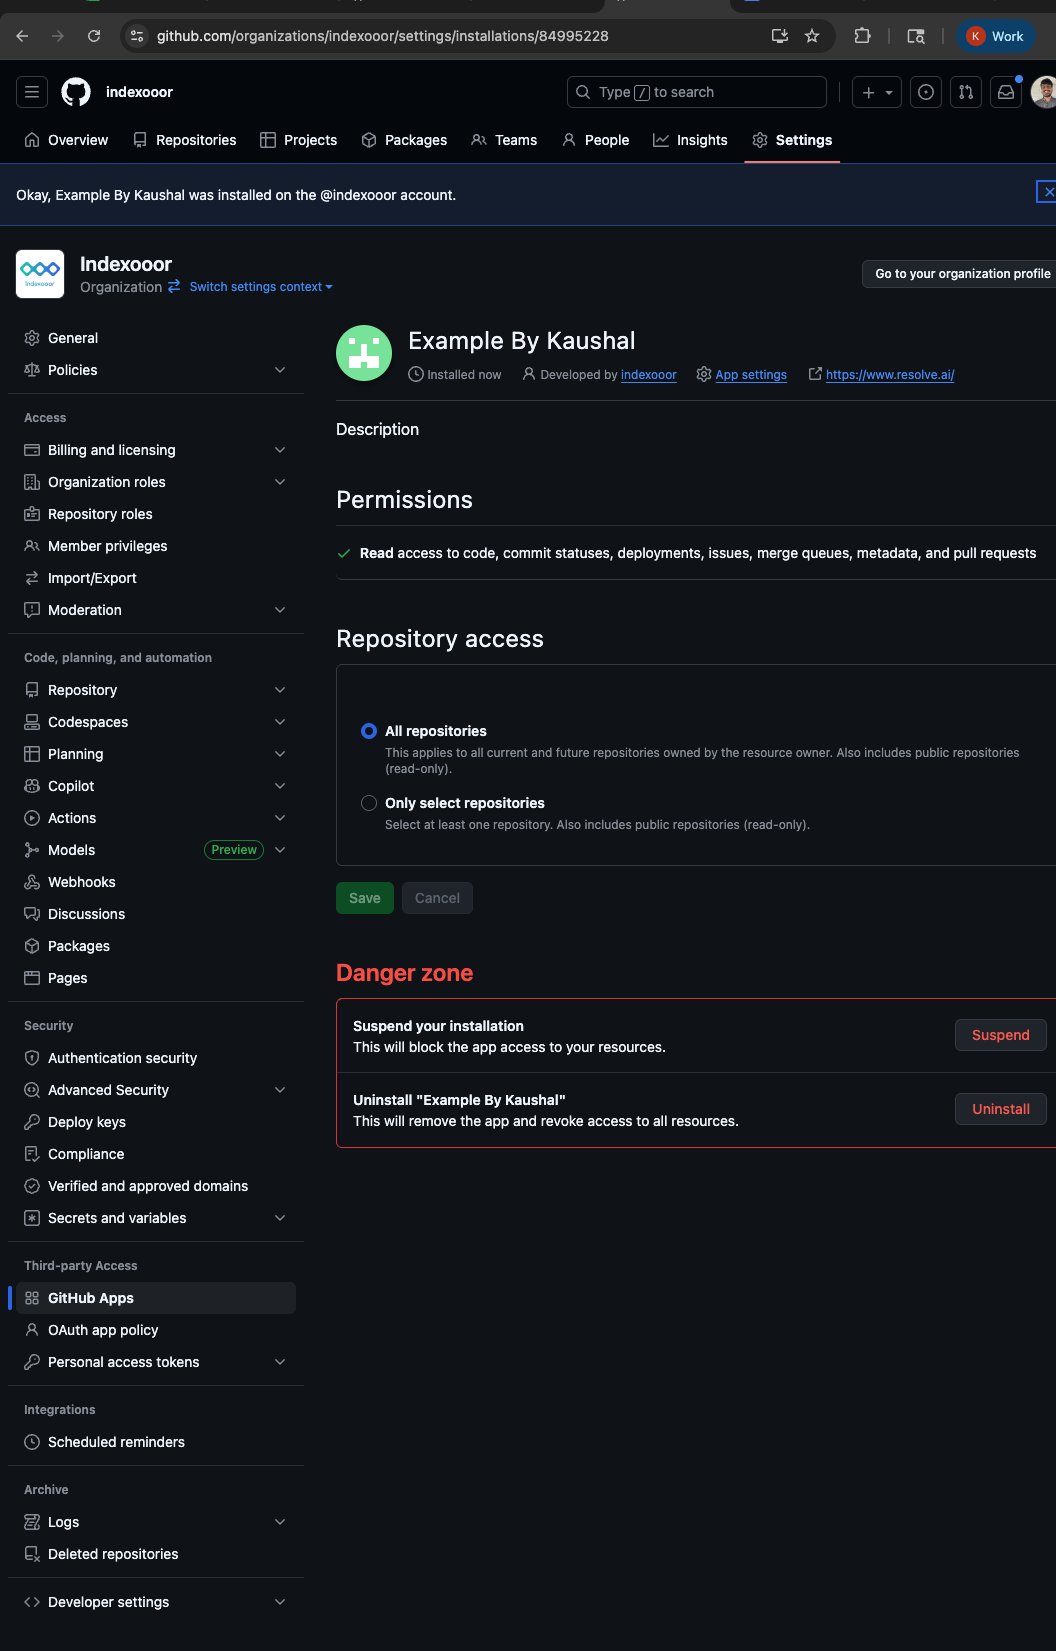
### Step 6: Collect the Installation ID and base URL
#### Installation ID
Path: **Profile picture > Settings > Applications > Configure** (on the app you just created). The installation ID is the trailing number in the URL.
Example: `https://github.com/organizations//settings/installations/84995228`, installation ID is `84995228`.
The permission summary GitHub shows on this screen mirrors exactly what you configured in [Step 3](#step-3-set-repository-permissions). Confirm it matches the full recommended set: **Read and write** on **code** and **pull requests** (this is what enables PR creation), plus **Read** on actions, checks, commit statuses, deployments, discussions, issues, merge queues, and metadata. An older install may show a narrower summary, for example read-only on code/pull requests, or missing actions/checks/discussions. If so, return to the app's **Permissions & events** settings, add the missing permissions, and accept the update prompt on the existing installation (no reinstall needed).
### Step 6: Collect the Installation ID and base URL
#### Installation ID
Path: **Profile picture > Settings > Applications > Configure** (on the app you just created). The installation ID is the trailing number in the URL.
Example: `https://github.com/organizations//settings/installations/84995228`, installation ID is `84995228`.
 #### API base URL
| GitHub variant | Base URL |
| ------------------------------------------ | ---------------------------------------- |
| github.com | `https://api.github.com` |
| GitHub Enterprise Cloud (your-org.ghe.com) | `https://api.your-org.ghe.com` |
| GitHub Enterprise Server (v2.5+) | `https://github.your-company.com/api/v3` |
For older GHE Server versions or custom-overridden base URLs, contact your GitHub administrator.
### Step 7: Configure the Resolve integration
Connect the BYO app to Resolve through the Git integration's `ghe` auth type. Pick **SaaS** if your GitHub instance is reachable from the public internet, or **Satellite** if it lives inside your network.
### Connect via Resolve UI (Cloud)
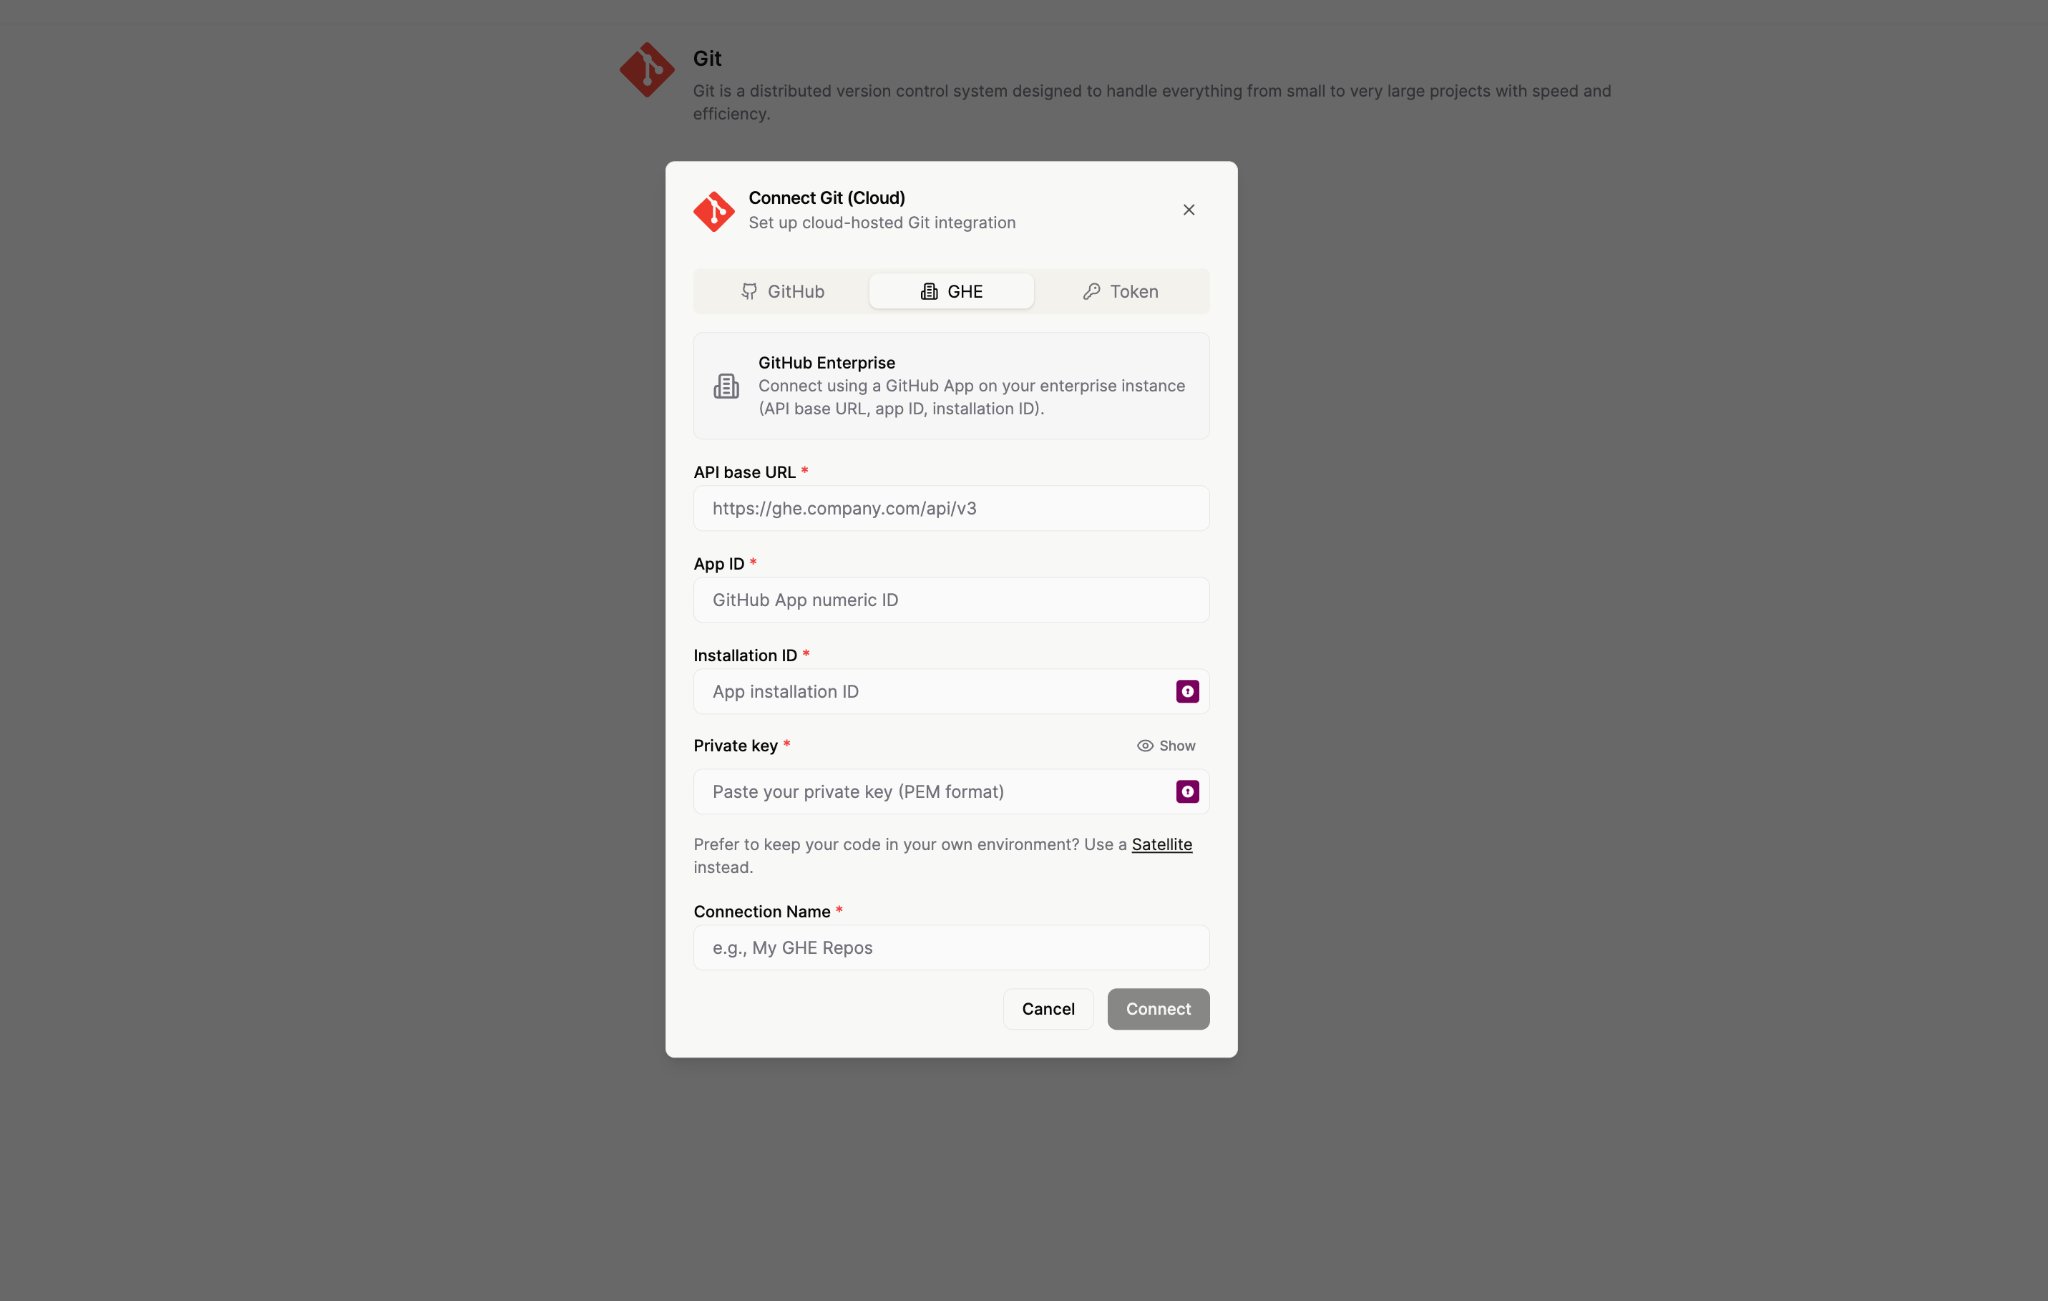
1. Open [**Git Integrations**](https://app0.resolve.ai/integrations/git/edit).
2. Create a **Cloud** Git connection.
3. Select the **GHE** auth tab.
4. Fill in the four fields:
* **API base URL**, from [Step 6](#api-base-url)
* **App ID**, from [Step 4](#step-4-collect-credentials-and-generate-a-private-key)
* **Installation ID**, from [Step 6](#installation-id)
* **Private key**, paste the PEM contents of the file from [Step 4](#step-4-collect-credentials-and-generate-a-private-key)
5. Save and verify the health check and repository listing.
#### API base URL
| GitHub variant | Base URL |
| ------------------------------------------ | ---------------------------------------- |
| github.com | `https://api.github.com` |
| GitHub Enterprise Cloud (your-org.ghe.com) | `https://api.your-org.ghe.com` |
| GitHub Enterprise Server (v2.5+) | `https://github.your-company.com/api/v3` |
For older GHE Server versions or custom-overridden base URLs, contact your GitHub administrator.
### Step 7: Configure the Resolve integration
Connect the BYO app to Resolve through the Git integration's `ghe` auth type. Pick **SaaS** if your GitHub instance is reachable from the public internet, or **Satellite** if it lives inside your network.
### Connect via Resolve UI (Cloud)
1. Open [**Git Integrations**](https://app0.resolve.ai/integrations/git/edit).
2. Create a **Cloud** Git connection.
3. Select the **GHE** auth tab.
4. Fill in the four fields:
* **API base URL**, from [Step 6](#api-base-url)
* **App ID**, from [Step 4](#step-4-collect-credentials-and-generate-a-private-key)
* **Installation ID**, from [Step 6](#installation-id)
* **Private key**, paste the PEM contents of the file from [Step 4](#step-4-collect-credentials-and-generate-a-private-key)
5. Save and verify the health check and repository listing.
 For full Cloud setup details (including JSON examples), see [Git on Cloud](/git-on-cloud).
### Connect via Resolve Satellite
Use this when your GitHub instance is only reachable from inside your network, or when you need code to stay in your environment.
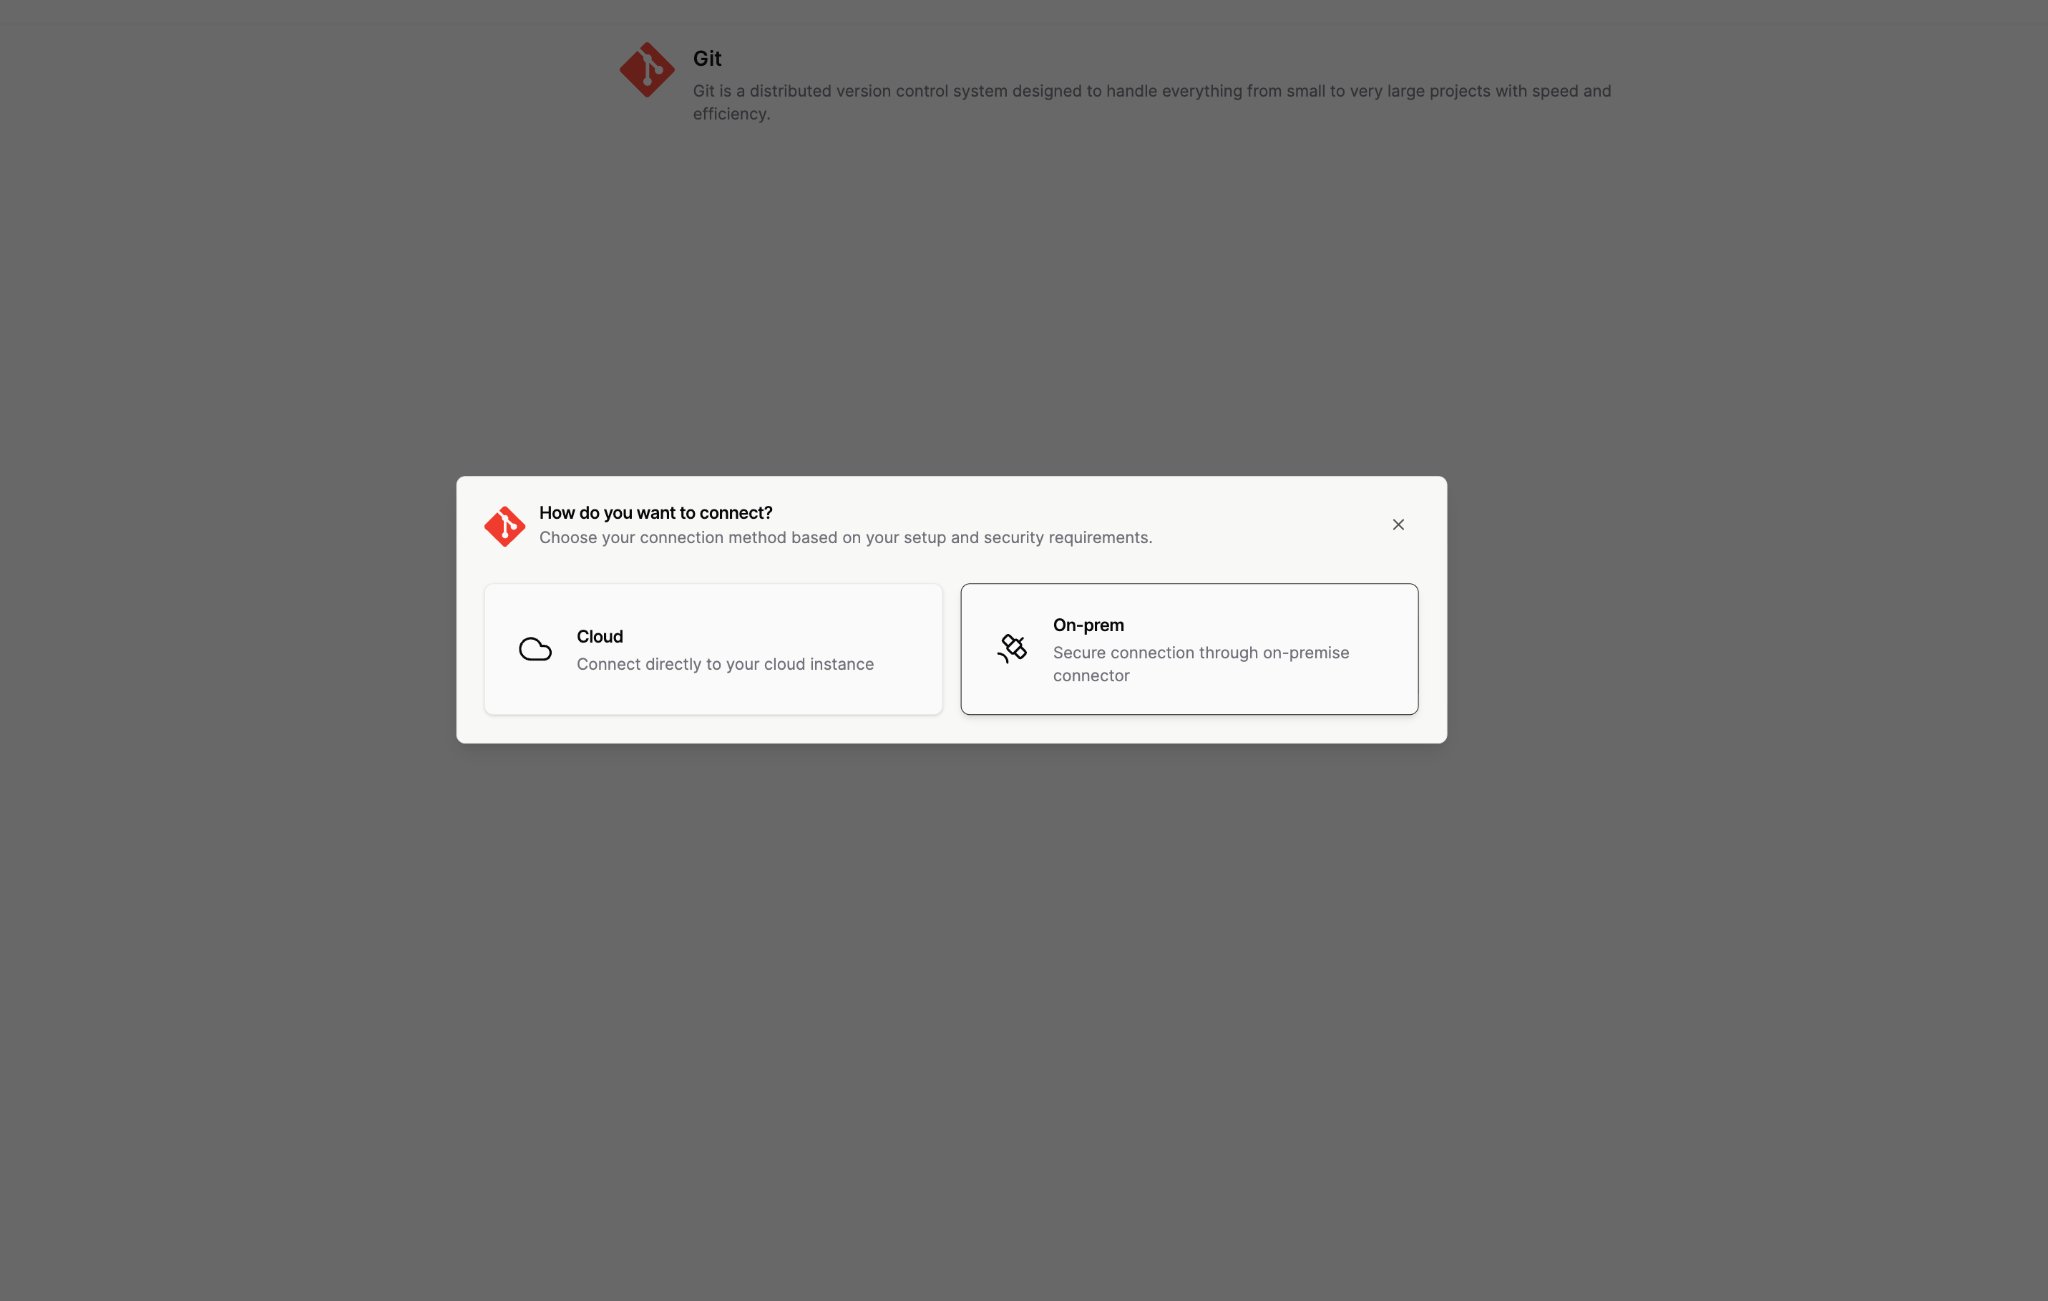
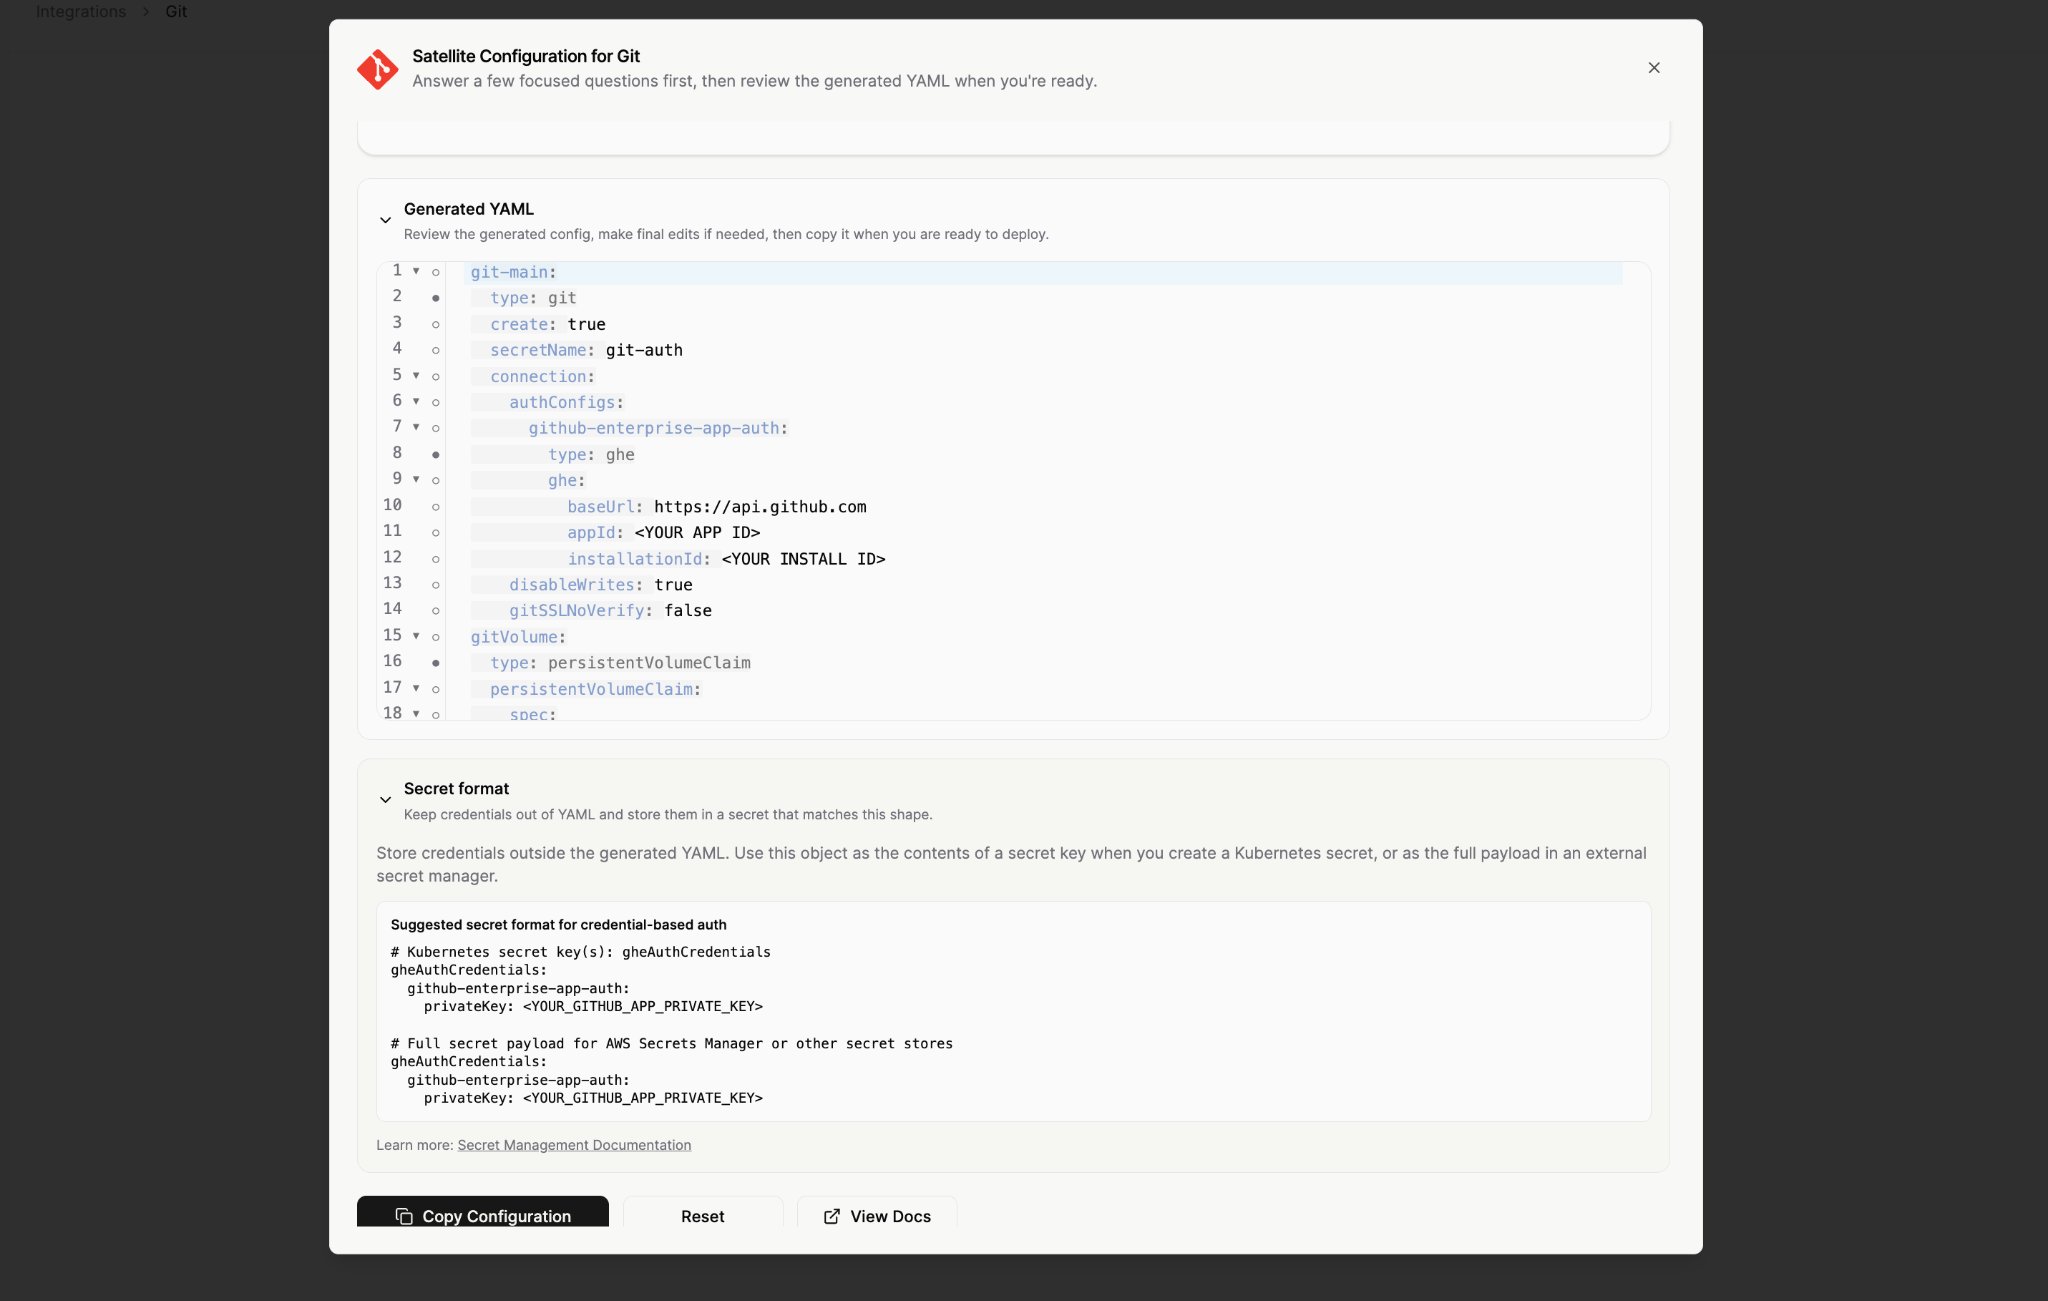
The Resolve UI includes a **Satellite Configuration for Git** form that generates the right `resolve-values.yaml` and a matching secret template, open your Git integration, choose **On-prem**, and click **Add GHE auth**.
For full Cloud setup details (including JSON examples), see [Git on Cloud](/git-on-cloud).
### Connect via Resolve Satellite
Use this when your GitHub instance is only reachable from inside your network, or when you need code to stay in your environment.
The Resolve UI includes a **Satellite Configuration for Git** form that generates the right `resolve-values.yaml` and a matching secret template, open your Git integration, choose **On-prem**, and click **Add GHE auth**.
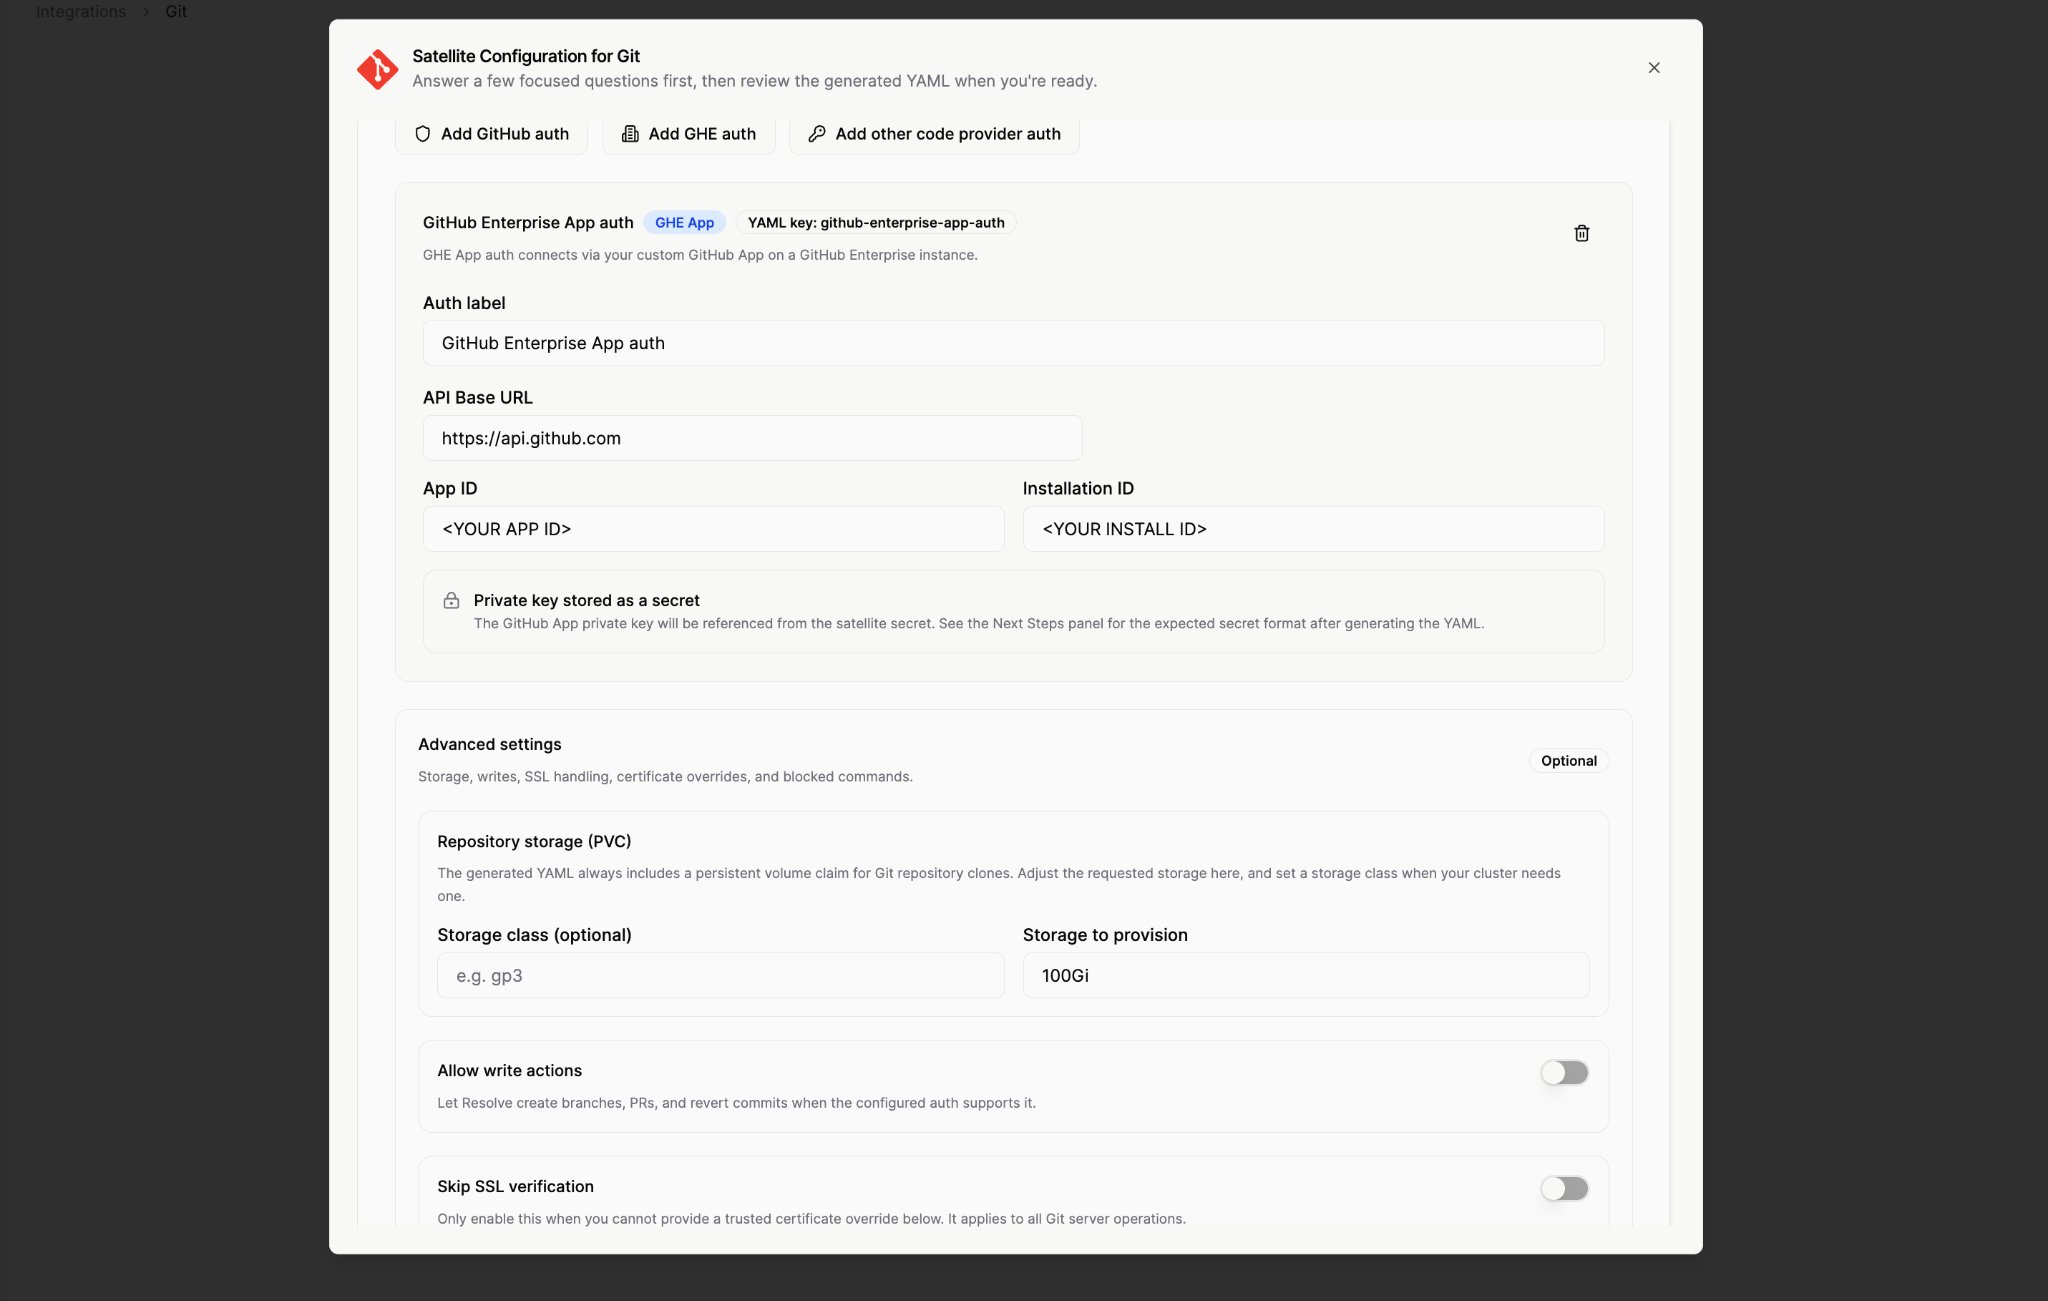 The form emits YAML in the shape below, plus a suggested Kubernetes secret format.
 #### 1. Create a Kubernetes secret with the private key
The private key goes into `gheAuthCredentials..privateKey`, keyed by the auth config name you'll use in the next step.
```yaml git-credentials.yaml theme={null}
apiVersion: v1
kind: Secret
type: Opaque
metadata:
name: git-credentials
stringData:
gheAuthCredentials: |
myGheApp: # auth config key, must match `authConfigs` in resolve-values.yaml
privateKey: |
-----BEGIN RSA PRIVATE KEY-----
...your downloaded private key...
-----END RSA PRIVATE KEY-----
```
```shell theme={null}
kubectl apply -f git-credentials.yaml
```
#### 2. Configure the Git integration on Satellite
Add a `ghe` auth config to your existing Git integration (or create a new one) in `resolve-values.yaml`.
```yaml resolve-values.yaml theme={null}
integrations:
gitGhe:
type: git
create: true
secretName: git-credentials
connection:
authConfigs:
myGheApp: # must match the key in gheAuthCredentials
type: "ghe"
ghe:
baseUrl: "https://github.your-company.com/api/v3"
appId: "12345"
installationId: "84995228"
gitVolume:
type: persistentVolumeClaim
```
For a self-signed GHE Server, add a `trustedCertificateOverrides.` block to the secret, see [Git on Satellite → Custom SSL certificates](/git-on-satellite#custom-ssl-certificates).
#### 3. Apply changes
```shell theme={null}
helm upgrade --install resolve-satellite \
oci://registry-1.docker.io/resolveaihq/satellite-chart \
--values resolve-values.yaml
```
#### 4. Verify integration
Open your Git integration in [Resolve](https://app0.resolve.ai/integrations/git/edit) and confirm the health check and repository listing.
For multi-auth examples (mixing `ghe` with `github` and `token` auth in one integration), advanced storage / certificate config, and Satellite-side troubleshooting, see [Git on Satellite](/git-on-satellite).
Capabilities only become available when the matching permission is granted on the app installation.
| Resolve capability | Permissions required |
| ---------------------------------------------------------------------- | -------------------------------------------------------------------------- |
| Repository read (clone, file reads, history, diffs) | Contents (Read), Metadata (Read) |
| Reading PR data (metadata, diffs, comments, file contents) | Pull requests (Read), Contents (Read), Metadata (Read) |
| **Proposing code changes and opening pull requests** | **Contents (Read & write), Pull requests (Read & write), Metadata (Read)** |
| Reading GitHub Actions workflow runs and workflow definitions | Actions (Read) |
| Reading PR check status | Checks (Read), Pull requests (Read) |
| Commit statuses, deployments, discussions, issues, merge queue context | The matching read permission for each |
If a feature returns `403`/permission denied at runtime, the app installation is usually missing one of these. Update the app's permissions on GitHub, accept the prompt to apply the new permission set on the existing installation, then retry.
***
## Frequently Asked Questions
The integration is installed as a GitHub App.
* You install the app on any repository you want ResolveAI to read.
* GitHub issues a short-lived installation access token automatically for each request, so you never manage or rotate PATs yourself.
* All token lifecycle and refresh logic is handled by ResolveAI behind the scenes.
The GitHub App requests the permissions documented in [Step 3](#step-3-set-repository-permissions). With those scopes, during an investigation the agent reads:
* Repository tree (file paths and file contents)
* Pull / Merge Requests (open and merged), including diffs and review comments
* Commit metadata and diffs
* Basic repository metadata (default branch, topics, permissions)
* GitHub Actions workflow definitions and recent runs (statuses, conclusions, head SHAs)
* Check runs and CI status for PRs
* Issues and Discussions referenced as context
You can review the precise permission set during installation or on the GitHub App page at any time.
No. Source code is streamed from GitHub **at runtime only** and is **not persisted or mirrored** on ResolveAI's servers. The sole exception is small code snippets that appear in your investigations, which are saved in ResolveAI SaaS or sent to Slack.
The GitHub App has write permissions on **Contents** (code) and **Pull requests**, but those are only used for explicit, user-invoked actions. Resolve never auto-pushes commits or opens PRs in the background. The app cannot merge code or alter repository settings.
If you want to disable writes entirely on a Git integration, set `disableWrites: true` on the integration's connection. Read-only operations stay available, write/remediation paths are blocked.
For BYO setups, you control the granted permissions on your own GitHub App.
[GitHub IP allowlist](https://docs.github.com/en/enterprise-cloud@latest/organizations/keeping-your-organization-secure/managing-security-settings-for-your-organization/managing-allowed-ip-addresses-for-your-organization)
Contact us at [help@resolve.ai](mailto:help@resolve.ai) to manage the allowlist of IP addresses for ResolveAI to connect to your GitHub organization.
#### 1. Create a Kubernetes secret with the private key
The private key goes into `gheAuthCredentials..privateKey`, keyed by the auth config name you'll use in the next step.
```yaml git-credentials.yaml theme={null}
apiVersion: v1
kind: Secret
type: Opaque
metadata:
name: git-credentials
stringData:
gheAuthCredentials: |
myGheApp: # auth config key, must match `authConfigs` in resolve-values.yaml
privateKey: |
-----BEGIN RSA PRIVATE KEY-----
...your downloaded private key...
-----END RSA PRIVATE KEY-----
```
```shell theme={null}
kubectl apply -f git-credentials.yaml
```
#### 2. Configure the Git integration on Satellite
Add a `ghe` auth config to your existing Git integration (or create a new one) in `resolve-values.yaml`.
```yaml resolve-values.yaml theme={null}
integrations:
gitGhe:
type: git
create: true
secretName: git-credentials
connection:
authConfigs:
myGheApp: # must match the key in gheAuthCredentials
type: "ghe"
ghe:
baseUrl: "https://github.your-company.com/api/v3"
appId: "12345"
installationId: "84995228"
gitVolume:
type: persistentVolumeClaim
```
For a self-signed GHE Server, add a `trustedCertificateOverrides.` block to the secret, see [Git on Satellite → Custom SSL certificates](/git-on-satellite#custom-ssl-certificates).
#### 3. Apply changes
```shell theme={null}
helm upgrade --install resolve-satellite \
oci://registry-1.docker.io/resolveaihq/satellite-chart \
--values resolve-values.yaml
```
#### 4. Verify integration
Open your Git integration in [Resolve](https://app0.resolve.ai/integrations/git/edit) and confirm the health check and repository listing.
For multi-auth examples (mixing `ghe` with `github` and `token` auth in one integration), advanced storage / certificate config, and Satellite-side troubleshooting, see [Git on Satellite](/git-on-satellite).
Capabilities only become available when the matching permission is granted on the app installation.
| Resolve capability | Permissions required |
| ---------------------------------------------------------------------- | -------------------------------------------------------------------------- |
| Repository read (clone, file reads, history, diffs) | Contents (Read), Metadata (Read) |
| Reading PR data (metadata, diffs, comments, file contents) | Pull requests (Read), Contents (Read), Metadata (Read) |
| **Proposing code changes and opening pull requests** | **Contents (Read & write), Pull requests (Read & write), Metadata (Read)** |
| Reading GitHub Actions workflow runs and workflow definitions | Actions (Read) |
| Reading PR check status | Checks (Read), Pull requests (Read) |
| Commit statuses, deployments, discussions, issues, merge queue context | The matching read permission for each |
If a feature returns `403`/permission denied at runtime, the app installation is usually missing one of these. Update the app's permissions on GitHub, accept the prompt to apply the new permission set on the existing installation, then retry.
***
## Frequently Asked Questions
The integration is installed as a GitHub App.
* You install the app on any repository you want ResolveAI to read.
* GitHub issues a short-lived installation access token automatically for each request, so you never manage or rotate PATs yourself.
* All token lifecycle and refresh logic is handled by ResolveAI behind the scenes.
The GitHub App requests the permissions documented in [Step 3](#step-3-set-repository-permissions). With those scopes, during an investigation the agent reads:
* Repository tree (file paths and file contents)
* Pull / Merge Requests (open and merged), including diffs and review comments
* Commit metadata and diffs
* Basic repository metadata (default branch, topics, permissions)
* GitHub Actions workflow definitions and recent runs (statuses, conclusions, head SHAs)
* Check runs and CI status for PRs
* Issues and Discussions referenced as context
You can review the precise permission set during installation or on the GitHub App page at any time.
No. Source code is streamed from GitHub **at runtime only** and is **not persisted or mirrored** on ResolveAI's servers. The sole exception is small code snippets that appear in your investigations, which are saved in ResolveAI SaaS or sent to Slack.
The GitHub App has write permissions on **Contents** (code) and **Pull requests**, but those are only used for explicit, user-invoked actions. Resolve never auto-pushes commits or opens PRs in the background. The app cannot merge code or alter repository settings.
If you want to disable writes entirely on a Git integration, set `disableWrites: true` on the integration's connection. Read-only operations stay available, write/remediation paths are blocked.
For BYO setups, you control the granted permissions on your own GitHub App.
[GitHub IP allowlist](https://docs.github.com/en/enterprise-cloud@latest/organizations/keeping-your-organization-secure/managing-security-settings-for-your-organization/managing-allowed-ip-addresses-for-your-organization)
Contact us at [help@resolve.ai](mailto:help@resolve.ai) to manage the allowlist of IP addresses for ResolveAI to connect to your GitHub organization.