> ## Documentation Index
> Fetch the complete documentation index at: https://docs.resolve.ai/llms.txt
> Use this file to discover all available pages before exploring further.
# ServiceNow
The ServiceNow integration can be configured via Resolve's UI or on the Resolve Satellite.
**Prerequisite**: You will need permissions to create integrations in ServiceNow as well as access to your organization's [ResolveAI integration page](https://app0.resolve.ai/integrations/serviceNow/connect).
## 1. In ServiceNow, create the integration
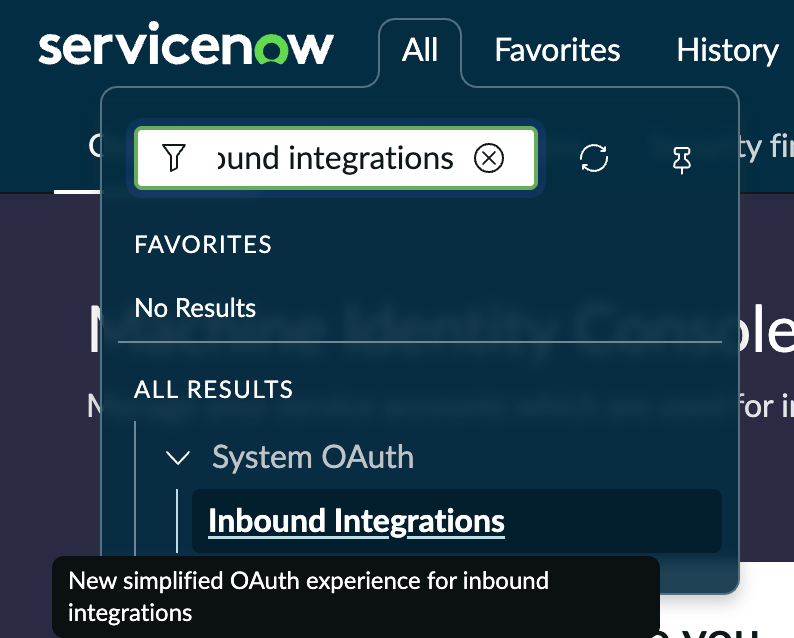
* In ServiceNow UI, open **Inbound Integrations**
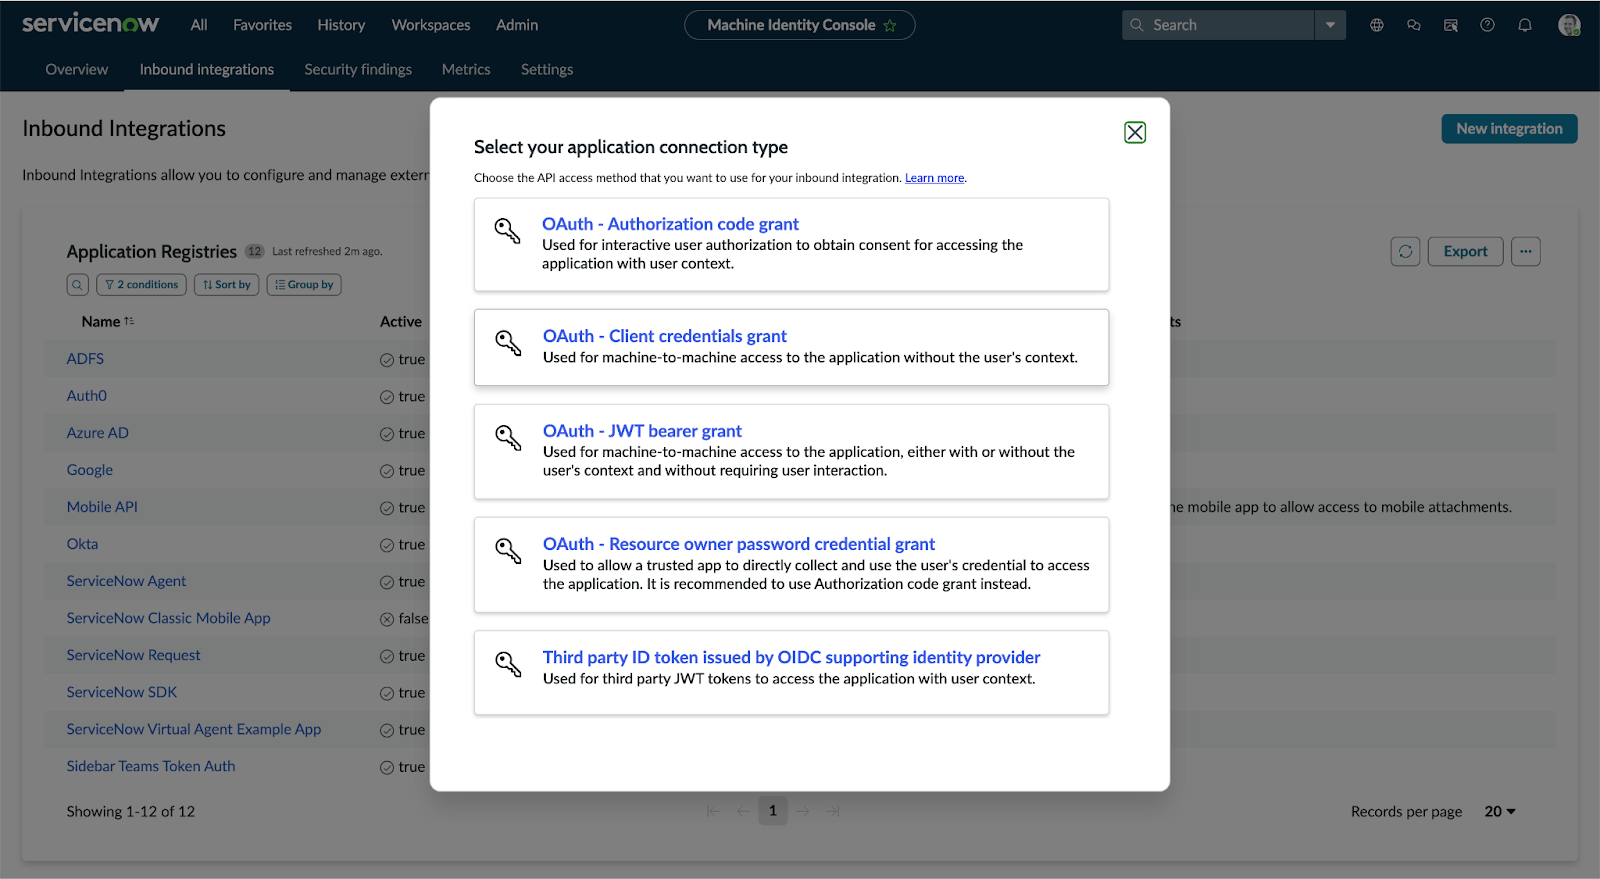
 * Click **New integration**
* Pick **OAuth - Client credentials grant**
* Click **New integration**
* Pick **OAuth - Client credentials grant**
 * Choose an application user role that has access these tables:
* `cmdb_rel_ci`
* `cmdb_ci_*`
* Copy both **Client ID** and **Client Secret** to use in the next step
**If your ServiceNow instance restricts inbound traffic by IP** (System Security > IP Address Access Control), add an allow rule for `3.16.200.209/32` so ResolveAI's cloud can reach your instance. This is only required when connecting from the ResolveAI cloud — Satellite-based connections originate from your own infrastructure.
## 2. In ResolveAI, connect the integration
### Option A: From the Resolve App
* Log in to ResolveAI and open the [ServiceNow integration page](https://app0.resolve.ai/integrations/serviceNow/connect).
* **Name** the integration, ex `Production ServiceNow`
* **Pick environments** that ResolveAI will connect to, for example `production` and `staging`
* **Client ID** paste in from ServiceNow
* **Client Secret** paste in from ServiceNow
### Option B: Setup from the Satellite
Create a Kubernetes Secret to hold your ServiceNow Inbound Integration’s **Client ID** and **Client Secret**.
```yaml theme={null}
apiVersion: v1
kind: Secret
type: Opaque
metadata:
name: servicenow-resolve-access-token
stringData:
clientId: ""
clientSecret: ""
```
On the command line, apply the secret.
```shell theme={null}
kubectl apply -f servicenow-resolve-access-token.yml
```
Add the ServiceNow integration to your Resolve Satellite’s configuration by updating the `resolve-values.yaml` file.
```yaml theme={null}
integrations:
serviceNow:
type: serviceNow
create: true
secretName: servicenow-resolve-access-token
connection:
url: "https://yourcompany.service-now.com"
```
On the command line, update the satellite with the new `resolve-values.yaml` file.
```shell theme={null}
helm upgrade --install resolve-satellite \
oci://registry-1.docker.io/resolveaihq/satellite-chart \
--values resolve-values.yaml
```
Finally, check the status of the satellite on your organization's integration page: [https://app0.resolve.ai/integrations](https://app0.resolve.ai/integrations)
## Troubleshooting
### Older ServiceNow versions (Yokohama and earlier)
If you don't see **OAuth - Client credentials grant** as an option when creating the integration, or the connection fails after setup, the following ServiceNow-side settings may need to be configured. These are typically pre-configured on newer instances but have been seen to be missing on Yokohama and earlier versions.
#### Enable the Client Credentials grant type
The Client Credentials inbound OAuth flow is gated by a system property that may not be set by default.
* In ServiceNow, navigate to **System Properties > All Properties** and click **New**
* Fill in the form:
* **Name**: `glide.oauth.inbound.client.credential.grant_type.enabled`
* **Type**: `true | false`
* **Value**: `true`
* Click **Save**
#### Add the OAuth Application User field to the form
The **OAuth Application User** field is hidden from the OAuth Application Registry form by default and must be added before you can assign the application user that ResolveAI will authenticate as.
* Open the Application Registry record for ResolveAI
* From the context menu (≡), choose **Configure > Form Layout**
* Move **OAuth Application User** into the **Selected** column and save
* Back on the record, set **OAuth Application User** to the user whose role grants the required `cmdb_rel_ci` and `cmdb_ci_*` table access
For ServiceNow's reference documentation on this flow, see [Client credentials grant flow (Yokohama)](https://www.servicenow.com/docs/bundle/yokohama-platform-security/page/integrate/authentication/concept/client-credentials.html).
* Choose an application user role that has access these tables:
* `cmdb_rel_ci`
* `cmdb_ci_*`
* Copy both **Client ID** and **Client Secret** to use in the next step
**If your ServiceNow instance restricts inbound traffic by IP** (System Security > IP Address Access Control), add an allow rule for `3.16.200.209/32` so ResolveAI's cloud can reach your instance. This is only required when connecting from the ResolveAI cloud — Satellite-based connections originate from your own infrastructure.
## 2. In ResolveAI, connect the integration
### Option A: From the Resolve App
* Log in to ResolveAI and open the [ServiceNow integration page](https://app0.resolve.ai/integrations/serviceNow/connect).
* **Name** the integration, ex `Production ServiceNow`
* **Pick environments** that ResolveAI will connect to, for example `production` and `staging`
* **Client ID** paste in from ServiceNow
* **Client Secret** paste in from ServiceNow
### Option B: Setup from the Satellite
Create a Kubernetes Secret to hold your ServiceNow Inbound Integration’s **Client ID** and **Client Secret**.
```yaml theme={null}
apiVersion: v1
kind: Secret
type: Opaque
metadata:
name: servicenow-resolve-access-token
stringData:
clientId: ""
clientSecret: ""
```
On the command line, apply the secret.
```shell theme={null}
kubectl apply -f servicenow-resolve-access-token.yml
```
Add the ServiceNow integration to your Resolve Satellite’s configuration by updating the `resolve-values.yaml` file.
```yaml theme={null}
integrations:
serviceNow:
type: serviceNow
create: true
secretName: servicenow-resolve-access-token
connection:
url: "https://yourcompany.service-now.com"
```
On the command line, update the satellite with the new `resolve-values.yaml` file.
```shell theme={null}
helm upgrade --install resolve-satellite \
oci://registry-1.docker.io/resolveaihq/satellite-chart \
--values resolve-values.yaml
```
Finally, check the status of the satellite on your organization's integration page: [https://app0.resolve.ai/integrations](https://app0.resolve.ai/integrations)
## Troubleshooting
### Older ServiceNow versions (Yokohama and earlier)
If you don't see **OAuth - Client credentials grant** as an option when creating the integration, or the connection fails after setup, the following ServiceNow-side settings may need to be configured. These are typically pre-configured on newer instances but have been seen to be missing on Yokohama and earlier versions.
#### Enable the Client Credentials grant type
The Client Credentials inbound OAuth flow is gated by a system property that may not be set by default.
* In ServiceNow, navigate to **System Properties > All Properties** and click **New**
* Fill in the form:
* **Name**: `glide.oauth.inbound.client.credential.grant_type.enabled`
* **Type**: `true | false`
* **Value**: `true`
* Click **Save**
#### Add the OAuth Application User field to the form
The **OAuth Application User** field is hidden from the OAuth Application Registry form by default and must be added before you can assign the application user that ResolveAI will authenticate as.
* Open the Application Registry record for ResolveAI
* From the context menu (≡), choose **Configure > Form Layout**
* Move **OAuth Application User** into the **Selected** column and save
* Back on the record, set **OAuth Application User** to the user whose role grants the required `cmdb_rel_ci` and `cmdb_ci_*` table access
For ServiceNow's reference documentation on this flow, see [Client credentials grant flow (Yokohama)](https://www.servicenow.com/docs/bundle/yokohama-platform-security/page/integrate/authentication/concept/client-credentials.html).