> ## Documentation Index
> Fetch the complete documentation index at: https://docs.resolve.ai/llms.txt
> Use this file to discover all available pages before exploring further.
# Splunk On-Call
This guide explains how to connect ResolveAI with Splunk On-Call (formerly VictorOps).
**How does Resolve use the Splunk On-Call integration?** Resolve scrapes incidents from the Splunk On-Call API and ingests them as alerts, so they can trigger and inform investigations. During an investigation, Resolve can also look up who is currently on call, read a team's or a user's on-call schedule, and pull the current incident list as evidence.
**Prerequisites:** You will need **admin access in Splunk On-Call** (only admins can manage API keys), and **admin access in ResolveAI** (only admins can manage integrations).
## 1. In Splunk On-Call, create an API key
Resolve authenticates to the Splunk On-Call REST API with an **API ID** and an **API Key**. Both come from the same page.
1. Log in to Splunk On-Call as an admin
2. Open **Integrations**, then select the **API** tab
3. Copy the value shown next to **Your API ID**
4. Click **+ New Key**
5. Give the key a description, ex. `ResolveAI`
6. Check the **Read-only** box
7. Create the key, then copy the **API Key** value from the list and store it securely
**Use a read-only key.** A read-only key is enough to enable every feature described in this guide.
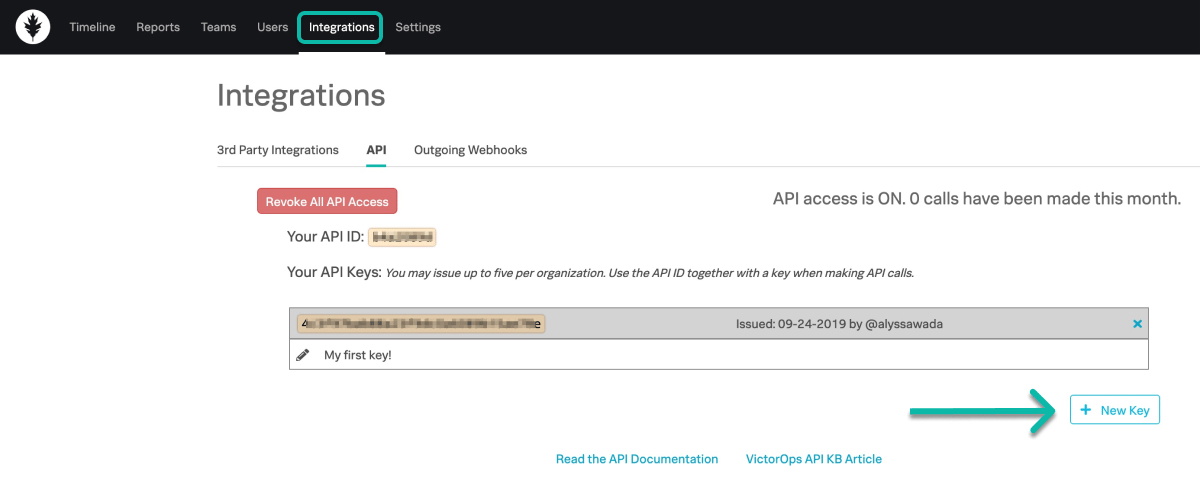
If you do not see the **API** tab at all, you are likely not an admin. Only admin users can create API keys - ask a Splunk On-Call administrator to create one for you.
## 2. (Optional) Find your routing keys
If you only want Resolve to ingest incidents for certain teams, you can scope the connection to one or more **routing keys**. Skip this step to ingest every incident in the organization.
1. In Splunk On-Call, navigate to [**Settings → Routing Keys**](https://help.splunk.com/en/splunk-enterprise/alert-and-respond/splunk-on-call/alerts/routing-keys)
2. Note the names of the routing keys you want Resolve to ingest
Routing keys tie alerts from your monitoring tools to a specific escalation policy, so they are usually the cleanest way to scope Resolve to the teams you are onboarding first.
## 3. In ResolveAI, connect Splunk On-Call
1. Open [the Splunk On-Call integration page](https://app0.resolve.ai/integrations/splunkOnCall/connect) in Resolve
2. Click **Add Connection**
3. Enter a **Name**, ex. `Splunk On-Call`
4. Paste your **Api Id** from Step 1.3
5. Paste your **Api Key** from Step 1.7
6. (Optional) Enter **Routing Keys** — a comma-separated list, ex. `platform, payments-team`. Leave blank to ingest all incidents.
7. Click **Save**